Repair
6 311717E
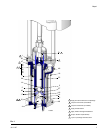
6. Install the throat packings into the outlet housing
(46) one at a time in the following order, with the lips
of the v-packings facing down:
The male gland (40*), two UHMWPE v-packings
(41*), one leather v-packing (42*), one UHMWPE
v-packing, one leather v-packing (42*), one UHM-
WPE v-packing, and the bearing (41). Loosely
install the wet cup (45).
7. Push the displacement rod (22) up into the outlet
housing (46) until it protrudes from the wet cup (45).
Continue reassembling the pump in the reverse
order of disassembly. Tighten the wet cup just tight
enough to prevent leakage.
Reconnect the Lower
1. Reinstall the displacement pump on the motor as
explained in your pump manual.
2. Reconnect the ground wire to the motor.
Check Valve Adjustment
The fluid piston and intake valves are factory-set for
high-volume pumping of heavy, spray-viscosity fluids.
For lighter fluids or lower volume requirements, or to
reduce surging at the stroke change-over, decrease the
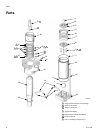
travel of the balls (3 and 4). Move the pins (2) to a lower
set of holes. See Parts, page 8 and refer to disassembly
procedure above.
For heavier fluids or to increase the flow, increase the
travel of the balls (3 and 4). See Parts, page 8 and refer
to disassembly procedure above.
Always replace the male gland (40) and the bearing
(47) when the throat packings are replaced.
If the ball travel is too short for the fluid being
pumped, the fluid flow will be restricted.


