


Repair
311717E 5
Repair
Disconnect the Lower
1. Flush the pump, if possible. Relieve the pressure,
see Pressure Relief Procedure on page 4.
2. Disconnect the hoses from the lower and plug the
ends to prevent fluid contamination.
3. Remove the pump from its mounting and place it in
a vise.
4. Disconnect the lower from the motor as explained in
your separate pump manual.
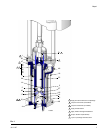
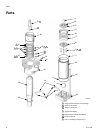
Lower Repair
Intake Valve
1. Remove the hex nuts (1) and washers (30) from the
tie rods (18). Unscrew the tie rods from the intake
valve. Remove the intake valve from the pump.
2. Disassemble the intake valve. Take note of which
set of holes the ball stop pin (14) is in.
3. Clean all parts thoroughly, and inspect them for
wear or damage. Replace parts as needed.
4. Reassemble the valve. Place the ball stop pin (14) in
the same holes from which it was removed. If you
want to change the fluid flow through the pump,
place the pin in a different set of holes. Refer to
Check Valve Adjustment, page 6.
5. If no further service is needed, reinstall the intake
valve on the pump. Torque the hex nuts (1) evenly to
50-60 ft-lb (68-81 N•m), using a criss-cross tighten-
ing pattern.
Piston
1. Remove the intake valve as explained above.
2. Pull the cylinder (24) down, off the piston assembly.
3. Unscrew the piston retainer screws (12). Remove
the piston parts from the displacement rod (22).
4. Clean all parts thoroughly, and inspect them for
wear or damage. Replace parts as needed.
5. Place the gasket (49) and ball (3) on the piston
retainer (27). Install these parts in the displacement
rod.
6. Install one cup packing (17) on the displacement rod
(22). Be sure the lips of the packing face up.
7. Install the packing spacer (16). Position one cup
packing (17) on the displacement rod so the lips of
the packing face down.
8. Install the piston guide (21). Install the four screws
(12) through the piston assembly and screw them
into the displacement rod (22). Torque the screws
evenly to 30-40 ft-lb (41-54 N•m), using a
criss-cross tightening pattern.
9. If no further service is need, go to Throat Packings.
If no further service is needed, slide the cylinder
(24) and gaskets (49*) over the piston assembly.
Install the intake valve. Torque the nuts (1) evenly to
50-60 ft-lb (68-81 N•m).
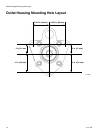
Throat Packings
1. Remove the intake valve and the cylinder (24) as
explained in the previous sections.
2. Remove the wet cup (45).
3. Pull the displacement rod (22) out of the bottom of
the outlet housing (46).
4. Remove the throat packings and glands from the
outlet housing (46).
5. Clean all parts thoroughly, and inspect them for
wear or damage. Replace parts as needed.
• To service the pump assembly, see manual
311833.
• To service the air motor, see manual 311238.
The piston retainer (27) must not obstruct the ports
in the displacement rod (22).