


5
132-7-99 IS1651
6 87
OVER
A
A
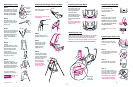
Step 2.
Slide hanger tubes into
armrests of seat as shown.
Step 3.
Insert two pin screws
through seat armrests
into the holes in the
hanger tubes and
tighten securely.
Step 4.
Insert the hanger tubes
into the hanger brackets
as shown. Metal buttons
should pop out and lock
upon full insertion.
CHECK that the
hanger tubes are
secure in hanger
brackets by pulling
firmly on them.
Attaching the Hanger Tubes and Seat
Step 1.
Move seat back fully forward
onto seat armrests.
The seat back must overlap
the armrests.
OVER
A
A
Seat back
Armrest
Working behind the seat,
snap the four pins in the
ends of the plastic back
brace into the holes in
the hanger tubes.
Slide adjustment wire
through openings in seat
back, then insert ends
into back brace holes as
shown.
Be sure the back brace
is securely attached by
pulling on it.
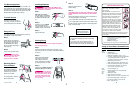
Attaching the Back Brace Attaching the Seat Belt
Step 1.
Thread one end of the
seat belt through the belt
retainer as shown.
Step 2.
Thread both ends of seat belt
through the buckles as shown.
CHECK that the belt is threaded
correctly by pulling on the seat
belt. The belt should not slip
through the buckle.
To release, push in on front of
buckle.
Push
Push
Attaching the Seat Cover
Step 1.
Slide the pocket of the seat
cover over the top of the seat
as shown.
Step 2.
Pull crotch strap and both ends
of the seat belt through the slots
in the seat cover.
Step 3.
Push the elastic loop through
the hole on one side of seat.
Step 4.
Fold cover around bottom of
seat. Then fasten the hook into
the elastic loop on one side as
shown. Repeat on other side.
CAUTION: Be sure the seat
cover at armrest does not
interfere with tray latching.
Dimple
Attaching the Legs
Step 1.
Push oval end of the upper
leg sections firmly onto the
four plastic pegs. Hold tube
vertically while pushing in.
Push leg on completely.
Step 2.
Push the leg tips on the
round ends of the lower leg
sections. (The other ends
have a wire.)
Step 3.
Put the wire end of lower leg
sections into the round end
of the upper leg sections.
Push the sections together
while twisting lower leg
slightly. This will ensure a
snug fit.
Step 4.
CHECK:
Lift swing as shown. If legs
are assembled properly, the
legs will dangle from the
motor unit and not fall off.
IF LEG FALLS:
Holding leg vertically, push
leg firmly up while pushing
the motor unit down.
Step 5.
Open the swing legs
completely. Snap plastic leg
braces onto outside of legs.
The plastic pins inside the
ends of the braces will fit into
the dimples on the legs.
It may be necessary to
spread the legs as shown.
Do not use
swing without the leg
braces.
Hold tube
vertically
Flattened
side
Plastic peg
Wire end
Round
end
(not oval)
Attaching the Tray
Push sleeve
all the way
into armrest
Place one hand on the armrest and slide the tray onto the
hanger tube with other hand. Push sleeve of tray all the
way into the armrest of the seat until you hear it snap.
Sleeve on tray must snap completely into the armrest.
Pull firmly on tray to be sure it is securely attached.