


Operation
For normal operation place the switch in the “AUTO” position and adjust the desired pool/spa temperature
setting. The “Power” LED indicator should always be on. (NOTE: During initial power up, the “POWER
indicator will blink for approximately 10 seconds while it stabilizes temperature readings). The “Heating”
LED indicator will show when the system is collecting solar heat. If the nocturnal cooling function is
enabled inside the GL-235, the “Cooling” LED indicator will show when the system is dissipating excess
heat.
In the “AUTO” position, the GL-235 will heat the pool or spa (rotate valve to solar loop) when the collector
(solar) sensor temperature is higher than the pool/spa sensor temperature by 4ºF or more AND the pool/spa
temperature is less than the "Desired Temperature" setting. The GL-235 will stop heating (return valve to
pool loop) when the two sensor temperatures get to within 1.5ºF OR the pool/spa sensor is above the
"Desired Temperature" setting.
To test the system, move the switch to “MANUAL TEST” and verify that both the “Heating” and “Cooling”
indicators light and that the valve(s) are in the solar loop position. Move the switch to “MANUAL OFF”
and verify that all indicators except “Power” are off. The valve(s) should be in the normal recirculating loop
position. If the valve(s) positions are working in reverse, follow the instructions in section marked “Low
Voltage (LV) : Solar Valve” to correct. WARNING: If recirculate freeze protection is being used, do
NOT leave the switch in the “MANUAL OFF” position during cold weather. Also note that the switch
does NOT turn power off to the GL-235.
Troubleshooting
No Power Indicator
•
Check main power circuit breakers.
•
Check fuse
Fuse Replacement
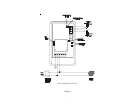
The GL-235 is protected by a fuse located on the left side of the main circuit board. Replace the fuse with
a 2A, type ATO-2 fuse, readily available in most automotive or electronics stores.
If “Heating” is always on
Disable recirculate freeze protection if enabled. Check that the switch is in the “AUTO” position. Next
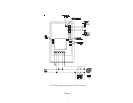
verify that the control circuitry is operating properly by disconnecting the solar sensor from the terminal
block. The “Heating” LED should go off and the “CHECK SENSOR” LED should begin to blink. If
“Heating” remains on, there is an internal circuit failure and the GL-235 will have to be returned for repair.
If “Heating” never comes on
Verify that the switch is in the “AUTO” position, the desired pool temperature dial is set higher (hotter) that
the actual pool temperature, and the solar sensor is warmer than the pool water. Also check that the switch
on the valve actuator is NOT in the "OFF" position. Disconnect the pool sensor from the terminal block and
verify that the “CHECK SENSOR” LED turns on. If the “CHECK SENSOR” LED does not turn on, there
is an internal failure and the GL-235 will have to be returned for repair. Reconnect the pool sensor and verify
that the “Check Sensor” LED turns off. Next, disconnect the “solar” sensor from the terminal block and
verify that the “CHECK SENSOR” LED begins to blink. If the “CHECK SENSOR” LED does not begin
to blink, there is an internal failure and the GL-235 will have to be returned for repair.
5