


16
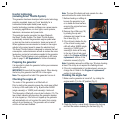
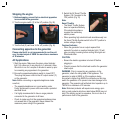
Spark plugs
1. Remove spark plug
maintenance cover (9) from
the generator housing (Fig. Q).
2. Remove the spark plug lead
(Fig. R).
3. Remove any dirt from around
the spark plug base.
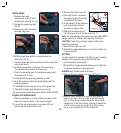
4. With the spark plug wrench provided remove the
spark plug (Fig. S).
5. Visually inspect the spark plug. Remove carbon deposits
using a wire brush.
6. Check for discoloration on the top of the spark plug.
The standard colour should be a tan colour.
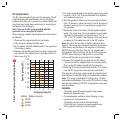
7. Check the spark plug gap. The acceptable gap should
be between 0.6–0.7mm.
8. Install/reinstall the spark plug carefully by hand.
9. Once the spark pug has been seated tighten with the
spark plug wrench.
10. Reinstall the spark plug cap on top of the spark plug.
11. Reinstall the spark plug maintenance cover (9)
The recommended spark plugs are as follows: NGK CR7HSA
Engine oil replacement
1. Place the generator on a level surface and warm up the
engine for several minutes. Then stop the engine.
2. Loosen the side maintenance cover screw (20) and
remove the side maintenance cover.
3. Remove the oil filler cap (19).
4. Drain dirty oil into a container
thoroughly by tilting the engine
toward the oil filler neck.
5. Once emptied, tilt the generator
back up and place into the
generator up right position.
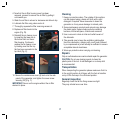
6. Refill with recommended oil.
Fill to the upper limit of the filler neck (Fig. T).
Note. The recommended 4 stroke engine oils are either SAE30
(single viscosity) or 10W30 (multi viscosity) 4 stroke oil.
CAUTION. Check that no foreign material, debris, dust
enters the crankcase.
7. Reinstall the oil filler cap (19).
8. Reinstall the side maintenance cover (5) and tighten the
cover screw (20).
Air filter
It is very important to maintain an air filter in proper condition.
Damage to the generator may arise if the filter has:
• Improperly been serviced (20).
• Dirt and other foreign elements adhering to the filter due
to improper installation and engine wear.
ALWAYS keep the filter clean at all times.
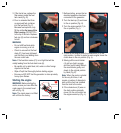
1. Remove the side maintenance cover (5) (Fig. U).
2. Remove the air cleaner filter cover by firstly pushing
down on the tab on the top of the air cleaner housing
(Fig. V). Once the air cleaner filter cover tab has been
released out of the filter housing, continue to detach the
air filter cover housing by raising the air filter housing
cover up and detaching it form the bottom tab.
Q
SR
V
U
Oil Filler Cap
Low Oil Level
Full Oil Level
T