


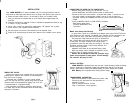

MANUAL OPERATION
TROUBLESHOOTING
SEMI-AUTOMATIC
This position will let you water your normal program
cycle at any time. Each valve’s WATER DURATION
will be operated for the program selected.
l
Set dial to “SEMI AUTOMATIC”
l
Push ON to start watering.
l
Push OFF to stop watering.
l
Push NEXT to advance to the next valve.
l
Return the dial to “AUTO” after watering cycle begins.
(The display will periodically show remaining time on the operating valve.)
MANUAL OVERRIDE
This position will allow you to water any individual valve or valves for a specific time.
If you are using a master valve, you can activate for manual override.
l
Push the NEXT button to select the valve you wish to water
l
Push the
+
button
to
set the time you wish to water, the display will show your time.
l
Push the NEXT button to select the next valve you
wish to water.
h
l
Push the +
button
to
set time, repeat setting until
all valves are set.
l
Push the
-
button
to
cancel any valves you do
not wish to water
If using a master valve or pump, press NEXT until
“master” is displayed (after last valve) press the
+
button.
The master is now on while your valves are watering.
SYSTEM OFF
This position will allow shut down of all water programs.
(allow 10 seconds to turn-off). For immediate shut down,
turn to “SYSTEM OFF” and push OFF button.
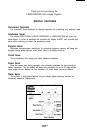
SENSOR OVERRIDE
Rain switches or moisture sensors are often used in automatic irrigation systems to
not allow automatic watering during rainy or wet conditions.
The
Lawn Master
provides convenient, sensor hook-up terminals and an override or
bypass option. The override option (OFF) lets you simply bypass the sensor for testing.
If you are not using a sensor, setting should be “OFF”.
l
Set dial to “SPECIAL FEATURES”
l Push NEXT twice, display will show “Sensor
N”
l
Push OFF to override. If not using a RAIN SENSOR, setting should be “OFF”.
l
Push ON to activate the RAIN SENSOR. Once installed the RAIN SENSOR will
override your programs.
A&
1. All valves do
not turn on
automatically
2.
Cannot Program
3.
Controller Skips
a Cycle
4.
No
Display
5. Valve Stays On
6. Valve will not
turn on
7. Controller
I. Note valve number flashing.
Displays SHORT
2.
Examine wiring connections for breaks or bad connections.
Verify program
Check valve common wire for proper hook-up
Check for shorted valve, refer to “Controller Displays SHORT
emove battery [check voltage]. Disconnect power to controller for 1 min.
econnect
power and reprogram. Reconnect good 9v alkaline battery.
erify
start times, time and water days
emove
battery [check voltage] Disconnect power to controller for 1 min.
econnect power and reprogram. Reconnect good
9V
alkaline battery.
Verify watering duration.
.
Disconnect valve; check for manual bleed closure.
.
Disconnect wire to valve. If still on, valve is bad.
.
Check for manual mode; place controller in SYSTEM OFF
.
Check solenoids for obstructions or wiring shorts.
.
Check valve for rocks or other obstructions or torn or damaged
diaphragm.
1
.
Verify start times, time and water days.
2. Make sure dial is not in SYSTEM OFF
3. Verify program, Review program (page x)
4. Make sure common wire and valve wire are connected.
5. Check solenoid and valve bleed tube.
6. Check for shorted valve; refer to “Controller Displays SHORT
7. Check RAIN SENSOR status (page
8).
set to OFF
Repair and reconnect.
3. Examine solenoid for shorted connections. Repair and reconnect.
4. Make sure solenoid rating does not exceed capacity of controller.
5. To reset, set dial to AUTO or press any button.
-