


ASSEMBLY
Your generator requires some assembly and is ready for
use at_er it has been properly serviced with the
recommended oil and fuel.
If you have any problems with the assembly of your
generator, please call the generator helpllne at
1-800-270-1408.
IMPORTANT:Any a_empt to run the unit before it hzs
been serviced with the recommended oil will result in an
engine failure.
Remove Generator From Carton
I, Set _rton on a rigid flat surface with "This Side Up"
arrows pointing upward.
2. Carefully open top flaps of shipping car_on. Review
"Cold Weather Operation" on pzge 10.
3. Cut down corners at one end of _rton from top to
bo_om and laythat side of _rton down tla=
4. Remove all pacl(Tngmaterial, car_on fillers, etc.
S. Remove the generator from the shipping carton.
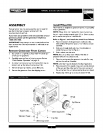
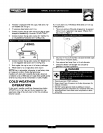
Install Wheel Kit
The wheel Idt is designed to greatly improve the por_bili_
of your generator.
NOTE:Wheel kit is not intended for over-the-road use.
You will need a socket wrench with I/2" or 13ram socl(ets
and a needle-nose plier to instil this kit,
Refer to Figure I and install the wheel kit as follows:
I. Place the bo_om of the generator cradle on a flat,
even surface.Temporarily place unit on bloc_ to e_se
assembly.
2. Slide zxle through both axle mounting brackets on
cradle frame, as shown in Figure I.
3. Slide a wheel over the axle.
NOTE: Be sure to install both wheels with the air
pressure valve on the outboard side.
4. Place the e-ring onto the groove in the axle.You may
add the flat washer if desired.
NOTE: Use retaining pins instead of e-clip, if appli_ble.
5. Place one end of the needle nose pliers on the bot_m
of the axle and the other end of the pliers on top of
the e-ring. Seat the e-ring by pressing the pliers closed.
6. Repeat step 3 through 5 to secure second wheel.
II vv