


13
G
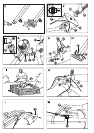
5.1 Connecting the Garden Vac
– cable lock / extension cable
(ill. C)
Loop the extension cable (5) and
insert it into the cable lock (6).
This prevents unintentional separ-
ation of the electrical connection.
Then connect it to the mains
cable.
5.2 Blow mode (ill. D/E)
With one hand hold the handle
(7), with the other hand hold the
additional handle (2). Select the
blowing symbol (
➡
) on the con-
trol knob for mode selection (8).
Push down and rotate the control
knob. Ensure that it locks into
the blow mode position.
To ensure best results in the
blow mode, move the Garden
Vac at a distance of 5-10 cm
(2-4 in.) between vacuum tube
and ground.
In the blow mode it is not neces-
sary to mount the catcher.
Start the Garden Vac by squeez-
ing the trigger (9) located inside
the handle (7). Release the trig-
ger (9) to stop the Garden Vac.
5.3 Vacuum mode (ill. D-I)
Fitting the catcher (ill. F/G)
To work in the vacuum mode,
firstly fit the catcher (10).
Insert the connecting piece (11)
of the vacuum hose (12) from the
outside into the round opening
of the catcher (10). Then push
the cellular ring (11a) onto the
connecting piece (11) inside the
catcher (ill. F). Push the counter
ring (13) provided (with the broad
collar first) from the inside of the
catcher (10) onto the connecting
piece (11) of the vacuum hose.
Listen for an audible snap-in!
To connect the connecting sleeve
(14) with the connecting angle
(15a), push the marking point of
the connecting sleeve over the
marking point of the connecting
angle until it stops. Then turn
the connecting sleeve of the hose
until it snaps in.
To remove it again, turn the hose
anti-clockwise and pull off the
hose.
Hang the catcher with the shoul-
der strap (16) on the left part
of your body. Adjust the shoulder
strap to comfortable length.
Ensure the catcher to be carried
at around waist level.
Using the Garden Vac (ill. D/H)
Select the vacuum symbol ( )
on the control knob for mode
selection (8). Push down and
rotate the control knob. Ensure
that it locks into the vacuum
mode position.
The tube runner (3) at the base
of the vacuum tube (1) allows
easy guidance of the vacuum
tube (1) on the ground.
The surface vacuum tube (17)
makes vacuuming of leaves and
dirt on larger areas possible.
The surface vacuum tube (17)
is equipped with a roller at the
bottom too, so that the Garden
Vac can be e.g. easily moved
over flagstones.
Fitting the surface vacuum
tube (ill. H1)
Attach the connector for the sur-
face vacuum tube (18) to the
vacuum tube (1).
Secure the surface vacuum tube
(17) with the orange locking screw
(19).
Start the Garden Vac by squeez-
ing the trigger (9) located inside
the handle (7). Release the trig-
ger (9) to stop the Garden Vac.
Emptying the catcher (ill. G/I)
If the vacuum power decreases,
empty the catcher (10).
Remove the vacuum hose (12)
from the unit’s connection
angle (15a) and unzip (20) the
upper part of the catcher. Thus
the catcher (10) can be easily
emptied.
Note: Do not dispose com-
postable material together with
your household rubbish.
5.4 Vacuum cleaning (ill. K)
For using the Garden Vac as
a vacuum cleaner, please fit
the dust filter (21) provided.
Unzip (20) the catcher (10)
and insert the dust filter (21).
Push the cardboard collar (22)
onto the counter ring (13) in-
side the catcher (10).
Note: Insert the dust filter only
in a dry catcher!
Zip up the catcher (10). Then
connect the vacuum hose (12)
to the connection angle (15a)
(see point 5.3).
To use of the surface vacuum
tube, follow the instructions given
under point 5.3.
If the vacuum power decreases,
empty or replace the dust filter
(21), if necessary (see point 5.3,
“Emptying the catcher”).
Remove the dust filter (21).
A
When using the Garden
Vac together with the dust
filter, pick up only fine and dry
materials.
Make sure that the dust filter
does not get damaged.
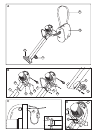
5. Using the product (ill. C-K)
➡
Fitting the connection angle
Fit the connection angle (15a)
onto the blow-off connecting piece
(15) of the casing until it snaps in.
Attention!
For safety reasons the Garden
Vac must not be operated with-
out connection angle.