


1716
GG
4.1 Contents
The packaging should include
the following parts:
.Hattrick HB 40
.Grass Catcher (disassembled)
.Top of guide handle
.Fastening parts for
guide handle and throttle
.Bowden cable clip
.Spark plug spanner
.Operating instructions
.TORX
®
-wrench
for changing blades
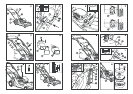
4.2 Assembly of the
guide handle (Fig. A)
Swivel the folded bottom part
of the guide handle (A1) into the
working position and allow it to
engage. Tighten well with the
lower linkage locking handles (2).
Put the top of the guide handle
(A2) onto the bottom part of the
guide handle (A1) and secure
using the fastening parts (thread-
ed bolt; plastic wing nut) (1).
4.3 Assembly of the throttle
(Fig. B)
The throttle (3) is already con-
nected in working order to the
petrol and brake bowden cables
(4/5). Insert the enclosed bolt (8)
from the outside through the
bore hole of the top of the guide
handle (A2).
The bolt (8) is located firmly by
the square bolt head, into the
guide handle.
Lift the brake lever (10) and insert
the brake bowden cable (11)
from the outside into the corre-
sponding bore hole (12). The cas-
ing of the throttle (9) is now insert-
ed onto the bolt (8) on the top of
the guide handle (A2).
Insert washer (7) before fastening
the nut (6) (as illustrated).
4.4 How to attach the starter
handle onto the top of the
guide handle (Fig. C)
By pushing the brake lever (10)
down, the brake is released from
the engine. The starter handle
(13) with starter cord (14) can now
be pulled out of its resting position
on the petrol motor. Now thread
the starter cord (14) into the guide
rings (15) on the top of the guide
handle (A2).
4.5 Fixing the bowden cables
(Fig. C)
Insert both petrol and brake
bowden cables into the provided
bowden cable clip (16) and press
them onto the bottom part of
the guide handle (A1).
4.6 Assembly of the
grass catcher (Fig. A/D)
The grass catcher is supplied
loose (3 component parts).
The carrying handle (17) is under
the protective cover (27).
Unfold the grass catcher (18) and
insert the supporting frame (19)
through the opening of the grass
catcher (18) so that the plastic
base is at the bottom.
Then open the fastening clamps
(20) by hand and fix them onto
the supporting frame (19).
Fasten the carrying handle (17)
by pressing onto the supporting
frame (19).
Note:
The supporting frame (19) is
shaped to locate the carrying
handle (17) in the correct
position.
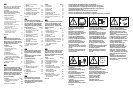
4. Assembly (Fig. A-D)
5.1 Preparation for initial
operation (Fig. E)
A
For environmental and
transport safety reasons
the petrol Hattrick lawn mower
is supplied without motor oil.
Therefore, the crankcase of
the engine must be filled with
0.6 l motor oil (SAE 30 or
10W30).
Unscrew the oil sealing cap (21)
and fill with 0.6 l of SAE 30 quality
oil.
The oil level can be checked
(when engine is switched off)
by means of the oil dip stick (22)
integrated in the oil sealing cap
(21). The oil level must be bet-
ween the ADD and FULL mark.
Always check the oil level
before mowing.
The recommended fuel is
unleaded two-stroke petrol.
A
Warning! Fuel is highly
inflammable. Fuel must
be stored only in containers
authorised for the purpose.
The fuel must be filled only
outdoors; do not smoke during
filling. Fill with petrol prior to
use; the petrol cap must not be
removed and no petrol may be
added if the engine is running
or is hot. If petrol is spilled dur-
ing filling, the engine must not
be started until the spilled
petrol has been wiped up and
the mower has been removed
from the area where the fuel
was spilled. No attempt must
be made to switch on the igni-
tion until the petrol vapours
have dispersed.
To safeguard against fire,
keep grass, leaves, grease and
oil away from engine and ex-
haust.
5. Initial operation (Fig. E/F)
6.1 General remarks
on the care of lawns
To keep your lawn well-groomed
we recommend cutting it regularly
once a week. Depending on the
growth of moss and weeds,
switch on the aerator cylinder as
required.
With frequent mowing and aerat-
ing the lawn becomes healthy
and strong.
Short clippings (up to a length
of about 1 cm) can be left on the
lawn. Longer clippings must be
removed to prevent the lawn
becoming yellow or matted.
Cut and aerate the lawn for the
first time in spring when the grass
begins to grow and can be walked
on. If the grass has grown too
long, first cut it lengthwise with
a high cutting setting (without
switching on the aerator cylinder)
and then cut at right angles with
the desired cutting setting, with
the aerator cylinder (optional)
switched on.
6.2 Mowing (Fig. G-I)
Cut only with sharp blades so
that the grass does not fray and
the lawn does not turn yellow.
To obtain a clean cutting result
guide the petrol Hattrick lawn
mower in rows as straight as pos-
sible. Ensure that the rows over-
lap by a few centimetres so that
no uncut strips are left behind.
Guide the Hattrick in walking
pace only.
Adjusting the cutting height
(Fig. G)
The petrol Hattrick lawn mower
has a central cutting height ad-
justment knob (24). In front of
the knob (24) the cutting height
is displayed (25) increments
of 5 mm.
Cutting height range 30 - 80 mm
Note:
When working on slopes, al-
ways mow at right angles to
the slope. To prevent the petrol
Hattrick lawn mower from slid-
ing way, point it slightly uphill.
Take extra care when changing
direction on slopes.
For safety reasons, slopes
with a gradient of more than
15° must not be mowed.
Always keep the under side of
the mower casing clean and
remove grass deposits. De-
posits complicate the start-up
procedure and affect the cut-
ting result as well as discharge
of grass clippings.
6.3 Mowing with the
aerator cylinder (Fig. H)
Switching the aerator cylinder
on/off
Switch off the engine before
switching the aerator cylinder
on or off.
To switch on the aerator cylinder
set the rotary switch (26) to
position “I”.
To switch it off set the rotary
switch (26) to position “0”.
Remarks on mowing with the
aerator cylinder switched on
The aerator cylinder can be used
for creating drainage, removing
matting and moss in the lawn
as well as for cutting flat-rooting
weeds.
If the grass is particularly long
due to infrequent lawn care (e.g.
after holidays), disengage the
aerator cylinder, and pre-cut with
the maximum cutting height
to prevent overload of the lawn
mower.
At the end of the cutting row
or for turning around, tilt the
mower on the rear wheels by
pressing on the guide handle.
This way you can turn it easily
with the aerator cylinder run-
ning free.
6. Information concerning correct mowing and aerating
5.2 Starting the Hattrick
lawn mower (Fig. F)
Place your petrol Hattrick lawn
mower on an even area of the
lawn.
If the engine is cold, press the
primer (23) several times before
starting. If the engine is hot there
is no need to use the primer (23).
Press brake lever (10) down to
the top of the guide handle (A2).
Push the throttle (3) to the symbol
(hare) and pull the starter
handle/cord (13) slightly until the
ratchet engages. Start the engine
by quickly pulling out the starter
handle/cord (13).
After that, the starter handle/cord
(13) must be allowed to return
slowly.
The motor speed can be reduced
by pushing the throttle (3) towards
the symbol (turtle).
Release brake lever (10) to switch
off the engine.
A
Make sure that the blades
and aerator roller (see 6.3)
can run freely before starting
the mower. Tilt the mower on
the rear wheels by pressing on
the guide handle.
Do not let the engine run in
closed spaces. There is danger
of carbon monoxide poisoning.
Never start up on a solid sur-
faced area (e.g. drives, tarred
surfaces etc.) with the aerator
roller switched on and a cutting
height of less than 55 mm as
the aerator springs can have
contact with the ground at this
setting.
Attention! Be aware that the
cutting blades take a while
to stop after turning off the
engine.