


17
GB
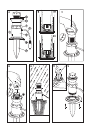
Mounting the base
2
(Fig. F4)
1. Alternatively the Rain Sensor can be screwed on a firm ground,
e.g. on the roof of the house, a stake or onto plates:
Screw the base
2
without the spike onto the receptacle
5
.
2. Secure the Rain Sensor using two screws e.g. on plates or similarly
firm ground.
Note: Make sure that the Rain Sensor is inserted in a perpendi-
cular position (90°).
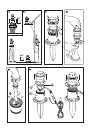
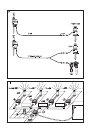
Controlling a watering system consisting of several watering lines
by using one Rain Sensor (Fig. I)
When controlling the watering system consisting of several watering
lines, the precipitation may be controlled centrally via one Rain Sensor:
Prior to the watering lines, a central Automatic Valve
B
, Art. No. 1241
is installed and connected with the Rain Sensor
C
(see fig. I).
However, make sure, that the watering data of the respective automatic
valve responds with the data set at the central automatic valve.
Example:
The following data are set at the automatic valves:
Start-Time Duration Cycle
Valve a 18:00 h 30 minutes daily
Valve b 20:00 h 20 minutes every 2nd day
Valve c 22:00 h 1 hour every 3rd day
Valve d 24:00 h 1 hour daily
These watering data must also be set at the central automatic valve
B
,
in order to prevent watering despite rainfall.
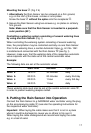
6. Putting the Rain Sensor into Operation
Connect the Rain Sensor to a GARDENA water controller using the plug
on the accompanying cable
3
(see also the operating instructions for
the respective water controller).
Important: When laying the cable make sure that it is not in a place
where it could be damaged or cause you or others to trip over it.
When laying the cable underground we recommend laying the cable
e.g. in a bed of sand.