


15
GB
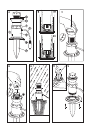
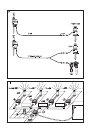
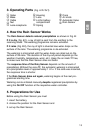
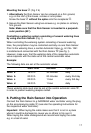
3. Operating Parts (Fig. A/D/G/I)
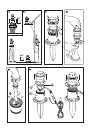
4. How the Rain Sensor Works
The Rain Sensor detects natural precipitation as shown in Fig. B:
If it is dry (Fig. B1), a ray of light is sent from the emitting to the
receiving diode:The watering programme remains activated.
If it rains (Fig. B2), the ray of light is diverted due water drops on the
surface of the lens: The watering programme is de-activated.
The watering is interrupted until the water drops are dried out on the
surface of the lens. The duration of the dry-out period depends on the
weather (humidity, temperature, wind, etc.). Keep the air inlets
A
free,
to make sure that the Rain Sensor dries out faster.
The response time of the Rain Sensor depends on the amount of
precipitation. Without the cone
0
, the automatic watering is interrupted
at a precipitation level of approximately 1 l/m
2
. If the cone was mounted,
the response time is shorter.
If the Rain Sensor dries out again, watering begins at the next pro-
grammed starting time.
Watering can be initiated manually despite registered precipitation by
using the On/Off function at the respective water controller.
5. Preparations for Use
Before using the Rain Sensor you must
1. insert the battery,
2. choose the position for the Rain Sensor and
3. set up the Rain Sensor.
1
Spike
2
Base
3
Cable
4
Nut
5
Lens-receptacle
6
Housing
7
Lens
8
Lid for battery
compartment
9
Spring
0
Cone
A
Air inlets
B
Automatic Valve
C
Rain Sensor