


Safety Precautions
14.Never pick up or carry a lawnmower while the
engine is running
15.Spark plug lead may be hot - handle with care.
16.Do not attempt any maintenance on your
lawnmower when the engine is hot.
17.Release the Operator Presence Control, to stop
the engine, and wait until the blade has stopped:
- before leaving the mower unattended for any period.
18.Release the Operator Presence Control, to stop
the engine, wait until the blade has stopped,
disconnect the spark plug lead and wait until the
engine has cooled:-
- before refuelling
- before clearing a blockage;
- before checking, cleaning or working on the appliance;
- if you hit an object. Do not use your lawnmower
until you are sure that the entire lawnmower is in
a safe operating condition;
- if the lawnmower starts to vibrate abnormally. Check
immediately. Excessive vibration can cause injury.
Maintenance and storage
1. Keep all nuts, bolts and screws tight to be sure
the lawnmower is in safe working condition.
2. Replace worn or damaged parts for safety.
3. Only use the replacement blade, blade bolt,
spacer and impeller specified for this product.
4. Never store the lawnmower with fuel in the tank
inside a building where fumes can reach an
open flame or spark.
5. Allow the engine to cool before storing in any
enclosure.
6. To reduce fire hazard, keep the engine, muffler
and fuel storage area free of grass, leaves or
excessive grease.
7. If the fuel tank has to be drained, this should be
done outdoors.
8. Be careful during adjustment of the machine to
prevent entrapment of the fingers between
moving parts and fixed parts of the machine.
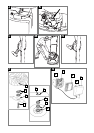
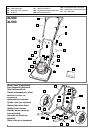
Assembly (without wheels)
Fitting the Lower Handle to the Lawnmower
1. Feed the hook (A2) attached to the lower handle
(A1) halfway through the centre slot of the guide
(A3), in the direction indicated by the arrow (A4).
2. Maintaining the hook (A2) in the centre slot of
the guide (A3) turn the lower handle (A1)
clockwise through 90
0
to place both legs of the
lower handle in position between the hood
brackets (A5).
3. Insert the pins (B1) and secure with the retaining
clips (B2).
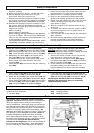
Fitting the Upper Handle to the Lower Handle
BEFORE
fitting the upper handle to the lower
handle, stabilize the lower handle by lifting the hook
(C1) to the 'parking' position (C2).
1. Ensure the Choke Control Lever is on the left
hand side when viewed from the rear.
2. Align the lower and upper handle (See fig D).
Locate the bolts (D1), washers (D2) and secure
with the handle knobs (D3).
3. Fit the cables to the handles with the cable ties
provided, making sure the cables are not
trapped between the upper and lower handles.
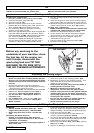
1. Fit the lower handle (E1) to the deck with the
lower handle pin (E2) as illustrated in Fig E.
2. Attach the wheels (F1) to the wheel frame (F2) with
the wheel retaining clips (F3) as illustrated in Fig F.
3. Fit the wheel frame (G1) to the deck with the lower
handle bolt (G2), small washer (G3), large washer
(G4) and locknut (G5) as illustrated in Fig G.
4. Locate the lower telescopic tubes (H1) inside the
upper telescopic tubes (H2) and secure with the pin
(H3) and retaining clip (H4) as illustrated in Fig H.
Fit the Upper Handle to the Lower Handle by
following the instructions above in ‘Assembly
(without wheels)’ section.
Assembly (with wheels)
Fuel
Use a fresh, clean, unleaded regular automotive
gasoline Do not fill the fuel tank in an enclosed area,
when the engine is hot or while youare smoking or
near a naked flame. Thoroughly clean around the fuel
tank filler cap before filling, this will help to prevent dirt
being introduced into the fuel system. Fuel should be
stored in a cool place away from naked flames. Do
not fill the tank while the engine is running. Fill the fuel
tank through a funnel fitted with a fine filter. Never fill
fuel tank completely, only fill to the base of the filler
neck. When filling the fuel tank from empty, or when
the engine has previously run dry, a minimum of 400cc
of fuel must be added (to the level of the line
indicated in the diagram) to ensure correct priming of
the fuel pump to start the engine. Your carburettor is
pre-set. Normally no further adjustment is required.
The handle position can be adjusted using the
guide and hook assembly.
1. Lift hook (C1).
2. Position as required:
(C2) Parking position
(C3) Mowing position
Handle Position
ENGLISH - 2