


6
Spool cap and nylon line cont’
Maintenance
Environmental Information
To replace nylon line.
For your convenience it is recommended you buy spool and
line complete. Nylon line only is also available. Both are
available from Electrolux Outdoor Products stockists.
• If you have spool and line complete, follow steps 5 to 11.
• If you have nylon line only, follow the full procedure below.
• IMPORTANT
Always wind the line onto the upper section of
the spool first.
• Remember! Your Flymo Trimmer is designed to
use only nylon line with a maximum diameter of
1.5mm. Use only genuine Flymo nylon line.
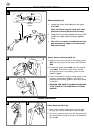
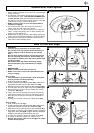
1. Take approximately 5 metres of line. Insert 15mm of
line into one of the holes in the upper section of the
spool (Q) and wind line in the direction of the arrows
on the top of the spool.
2. Leave approximately 100mm of line unwound and
place into cleat as illustrated in figure R.
3. Repeat on lower section of spool.
4. Care should be taken to ensure that the line is neatly
coiled on the spool. Failure to do so will impair the
efficiency of the automatic line feed.
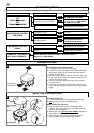
5. Remove the cap.
6. Remove the old spool.
7. Place spool into spoolholder.
8. Release one line from cleat.
9. Secure line into slot (P).
10.Repeat for second line.
• Ensure spool is fully located by gently rotating it dur-
ing fitment, whilst keeping the spoolholder steady.
11.Refit the cap.
• WARNING
Disconnect from the mains electricity supply,
before attempting any maintenance or adjustment.
Cutting head continues to rotate after the trimmer
has been switched off. Keep fingers and hands
clear of the line cutter on leading edge of guard.
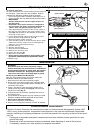
Caring for your Multi-Trim Revolution
After you have finished using your Flymo Multi-Trim
Revolution follow the procedure below:
1. Disconnect from the mains electricity supply.
2. Never clean your trimmer with water, cleaning fluids,
or solvents, just remove debris with a suitable tool, a
soft brush or dry cloth.
4. Using a soft brush, clean around the inside of the
safety guard, the cutting head (Fig S) and the motor
housing air vents.(Fig T)
5. Inspect the trimmer carefully, especially the parts of
the cutting head.
6. If your trimmer is damaged in any way contact your local
Electrolux Outdoor Products approved service centre.
• Never use a damaged trimmer.
7. Wind cable carefully to avoid kinking.
8. Store in a cool, dry place and out of reach of children.
Electrolux Outdoor Products are manufactured under an Environmental Management System (ISO
14001) using, where practical, components manufactured in the most environmentally responsible
manner, according to company procedures, and with the potential for recycling at the end of the prod-
ucts’ life.
• Packaging is recyclable and plastic components have been labelled (where practical) for cate-
gorised recycling.
• Awareness of the environment must be considered when disposing of ‘end-of-life’ product.
• If necessary, contact your local authority for disposal information.
S
T
Q
lower section
upper section
R
SECURING LINE INTO CLEATS