


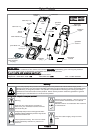

Cutting Height Adjustment
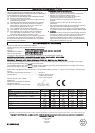
Removing and Fitting the Blade
Switch off, wait until the blade has stopped rotating and
disconnect from the mains electricity supply BEFORE
attempting to remove or refit the blade. Always handle
the blade with care - sharp edges could cause injury.
USE GLOVES.
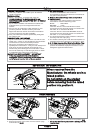
Removing the Blade
1. To remove the blade bolt, hold the blade firmly with a
gloved hand and with a spanner, loosen the blade bolt
by turning it anti-clockwise (X).
2.
Remove the blade bolt, blade and adaptor. (X)
3. Inspect for damage and clean as necessary.
Renew your metal blade after 50 hours mowing or 2
years whichever is the sooner - regardless of condition.
If the blade is cracked or damaged replace it with a new
one.
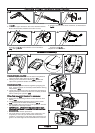
Fitting the Blade
1. Attach the adaptor to the shaft.
2. Fit the blade to the adaptor ensuring that once it is
fitted you are able to read the text on the blade ‘This
side to grass’
3. Re-assemble blade bolt through the blade and the
adaptor.
4. Hold the blade firmly with a gloved hand and tighten
the blade bolt firmly with a spanner. Do not over
tighten.
X
blade
blade bolt
adaptor
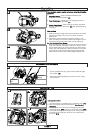
Cutting Height Adjustment
• Height of cut is adjusted by raising or lowering the
wheels using the height adjustment lever (Q)
• There are five heights of cut on this product.
• NOTE
A medium height of cut is recommended for
most lawns.
The quality of your lawn will suffer and
collection will be poor if you cut too low.
Q
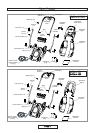
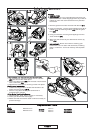
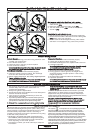
Starting and Stopping
To Start your Lawnmower
1. Connect female extension cable connector to the back
of the switchbox. (R)
2. Form loop in mains cable and push the loop through
the slot. (S)
3. To secure, position loop over the hook and pull the
cable back through the slot (T).
4. Connect plug to mains and switch on.
5. Tilt the handle downwards to slightly raise the front of
the lawnmower and to reduce the risk of lawn damage
whilst starting.
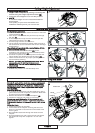
The switchbox is provided with a lock-off button (U1) to
prevent accidental starting.
6. Press and hold the lock-off button (U) on the
switchbox, then squeeze one of the Start/Stop levers
towards the upper handle (V).
6. Continue to squeeze the start/stop lever towards the
upper handle and release the lock-off button (W).
7. Lower the lawnmower to its proper operating position
and commence mowing.
• NOTE - There are two start/stop levers fitted. Either
one can be used for starting the lawnmower.
• IMPORTANT - Do not use the start/stop levers
intermittently
To Stop your Lawnmower
1.
Release the pressure on the Start/Stop lever.
V
1
PAGE 8
W
R S
T
U