


2
FACTORY PRESET ‘TURN-ON-AND-GO’ MARKS
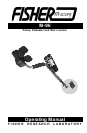
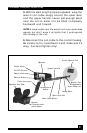
Your Fisher M-96 is fairly simple to operate, especially when
compared to other metal detectors. Even so, we strongly
recommend that you read this entire manual. You’ll be able to tune
your M-96 to your specific needs and conditions.
But if you just can’t wait any longer, and you’re an experienced
detector user, here’s some quick instructions to get you going:
1. Unpack your M-96 carefully, and save the box. It
may come in handy if you need to ship the instrument.
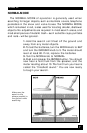
2. Take a look inside the lock nut on the upper
handle to see if the yellow locking pad is on the
left-hand side for a lower handle with a flat on one
side. Loosen the locking nut by rotating it fully
counterclockwise. This is the configuration for all
M-96’s up to Serial #62230. Units with Serial #62231
and after have a locking pad at the top and a
round lower stem with a stem lock button fitting in
one of the holes at two (2) inch intervals on the
back side of the upper handle.
3. Slip the lower stem into the upper handle, making
sure the flat side of the stem is aligned with the
locking pad inside the lock nut, (Serial No. 62230
and before).
4. Adjust the stem length and coil angle so that the
search coil rests flat on the ground about 6-12
inches in front of and slightly to the right of your
right foot (to the left of your left foot for left handers).
Your arm should be straight and relaxed, the grip
held loosely. The stem length is adjusted by
loosening the nylon wing nut on the search coil.
NOTE: Remember, the longer the shaft, the more you’ll
have to bend your elbow to keep the coil off the ground
and the sooner your arm will get tired. The M-96 is balanced
for comfortable searching in a tight semicircle around
the front of the operator.
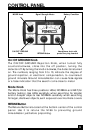
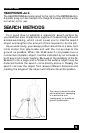
CONDENSED OPERATING INSTRUCTIONS