


Operation
have stopped before clearing blower assembly or
mower deck
3. To remove the bags, rst shut off deck drive, stop
the engine and wait for all moving parts to stop.
Open the hood and remove the bags by lifting up
on the rear of the bag, then unhooking the front
clip. Empty the bags by inverting them.
4. Reinstall bags, close and latch hood before
continuing mowing.
Tips for mowing conditions:
• When mowing in areas with sandy soil, use
low lift blades on the cutting deck and higher
cutting heights to minimize wear on the blower
components.
• When mowing in wet conditions, such as just after
a rain or in heavy dew, use low lift blades on the
cutting deck to minimize plugging of the blower.
• Maintaining a ground speed that does not pull
down the engine RPM will allow for the highest
productivity and best quality of cut. Bogging the
engine RPM down by going too fast will cause
plugging and quality of cut issues.
• When the bags get full, the sound of the blower
will change and there will be slight blowout from
the front right corner of the deck. Emptying the
bags at this point will minimize the potential for
the tube to plug.
• For units below Serial Number 600,000:
Anti-blowout kits are available for leaf collection.
They help to prevent “chasing” the leaves. To
reduce “plowing” leaves, raise the deck slightly.
• On Triton: Raise front adjustable bafe to
reduce plowing. Lowering front adjustable bafe
may prevent “chasing”. Match discharge opening
to Ultra Vac intake for best performance.
Bagger Removal for Side Discharge
1. Shut off the deck drive, stop engine and wait for
all moving parts to stop. Remove key and engage
parking brake.
2. Remove the discharge tube by releasing the
latches at the blower. Slide the tube off the blower
outlet and remove the upper end from the hood.
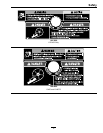
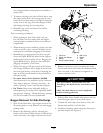
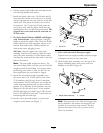
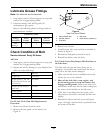
Figure 5
1. Clevis Pin 5. Belt Cover
2. Caster Arm Weight
6. Blower
3. Hairpin 7. Tube
4. Front Floorpan Weight 8. Bags
3. Remove the belt cover by loosening the knobs.
For 60 inch and 66 inch units the outboard knob
does not need to be removed completely to
remove the belt cover.
CAUTION
The deck sheave will become very hot.
Touching a hot deck sheave can cause severe
burns.
Allow the deck sheave to cool completely
before removing the belt.
4. Pull the idler release handle and remove the belt
from the upper groove of the deck sheave.
5. Unlatch the front end of the blower. Pivot the
blower back and lift it off the deck.
6. Install the discharge chute using the chute pivot
pin and hairpin (see Figure 6).
13