


Maintenance
Note: If machine does not pass any of these tests,
Do Not operate. Contact your authorized EXMARK
SERVICE DEALER.
Important: It is essential that operator safety
mechanisms be connected and in proper
operating condition prior to use for mowing.
Check Rollover Protections
Systems (Roll Bar) Pins
Service Interval: Before each use or daily
Make sure latch pin and hair pin are fully installed
and lanyard is in good condition.
Check Seat Belt
Service Interval: Before each use or daily
Visually inspect seat belt for wear, cuts, and proper
operation of retractor and buckle. Replace before
operating if damaged.
Check for Loose Hardware
Service Interval: Before each use or daily
1. Stop engine, wait for all moving parts to stop, and
remove key. Engage parking brake.
2. Visually inspect machine for any loose hardware
or any other possible problem. Tighten hardware
or correct the problem before operating.
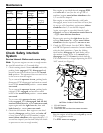
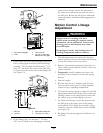
Service Air Cleaner
Service Interval: Every 50 hours (May
need more often under
severe conditions. See
the Engine Owner’s
Manual for additional
information.)
1. Stop engine, wait for all moving parts to stop, and
remove key. Engage parking brake.
2. Tilt seat forward and raise hood to gain access
to the air cleaner.
3. Loosen retaining clips and remove air cleaner
compartment cover.
4. Remove paper element. Check the condition
of the paper element. Replace if dirty, bent or
damaged.
5. Check the condition of the inner element. Replace
whenever it appears dirty, typically every other
time the paper element is replaced. Clean the base
around the inner element before removing, so
dirt does not get into the engine.
6. Do Not wash or use pressurized air to clean
paper element or inner element.
7. Reinstall elements. Position the cover so that the
rubber dust ejector is pointing downward and
secure with retaining clips.
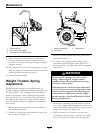
Change Engine Oil
Service Interval: After the rst 5 hours
Every 100 hours/Yearly
(whichever comes rst)
(May need more often
under severe conditions.)
1. Stop engine, wait for all moving parts to stop, and
remove key. Engage parking brake.
2. Tilt seat forward and raise hood to gain access
to the engine area.
3. Drain oil while engine is warm from operation.
4. Fit hose in literature pack over oil drain valve.
Rotate the valve 1/4 counterclockwise and gently
pull outward to open the valve. Allow the oil to
drain, then close the valve by pushing inward and
rotating 1/4 turn clockwise. Remove and retain
the hose for future use.
5. Replace the oil lter every other oil change. Clean
around oil lter and unscrew lter to remove.
Before reinstalling new lter, apply a thin coating
of oil on the surface of the rubber seal. Turn
lter clockwise until rubber seal contacts the lter
adapter then tighten lter an additional 2/3 to
3/4 turn.
6. Clean around oil ll cap and remove cap. Fill to
specied capacity and replace cap.
7. Use oil recommended in engine owner’s manual.
Do Not overll. Start the engine and check for
leaks.
Check Hydraulic Oil Level
Service Interval: Every 40 hours
1. Stop engine and wait for all moving parts to stop.
Engage parking brake.
27