


Maintenance
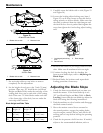
1. Loosen the upper bolt holding the control lever
to the control arm shaft.
2. Loosen the lower bolt just enough to pivot the
control lever fore or aft Figure 30. Tighten both
bolts to secure the control in the new position.
3. Repeat the adjustment for the opposite control
lever.
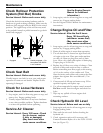
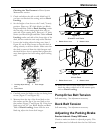
Full Forward Tracking
Adjustment
If the machine travels or pulls to one side when the
motion control levers are in the full forward position,
adjust the cover plates.
1. Loosen the screws on a cover plate (see Figure 31).
2. Slide the cover plate backward or forward to
adjust the travel of the lever and tighten the
screws.
3. Drive the machine and check the full forward
tracking.
4. Repeat steps 1 through 3 until desired tracking
is obtained.
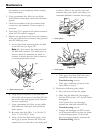
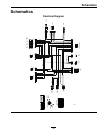
Figure 31
1. Control arm shaft
3. Tracking plate
2. Tracking plate nut
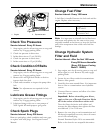
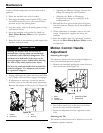
Adjusting the Seat Ride
Suspension
The number of seat springs can be changed to
maximize rider comfort. More springs should be used
with heavier operators and on rough terrain. Fewer
springs should be used with lighter operators and
when mowing smooth, well established lawns. Always
keep the number of springs on the left and right side
the same when adding and removing springs.
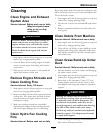
Figure 32
1. Bolt 3. Nut
2. Spring
4. Additional mounting
holes
Up to ve springs can be secured to the seat box with
a nut and bolt, see Figure 32.
Refer to the Parts Manual for spring and hardware
part numbers.
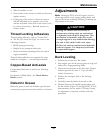
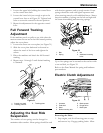
Electric Clutch Adjustment
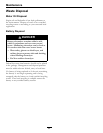
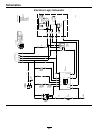
Figure 33
1. Armature 5. Brake spacer
2. Field shell 6. Re-gap shim
3. Rotor 7. Brake pole
4. Brake mounting bolt
Removing the Shim:
1. Stop engine, wait for all moving parts to stop,
and remove key. Engage parking brake. Allow
39