


Maintenance
LZUVQD11 Units:
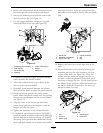
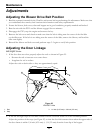
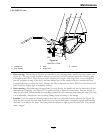
Figure 26
LZUVQD11 Units
1. Handle Link
3. Stop
5. Latches
2. Stop Screws
4. Hinge Links
1. Door closing: The closing of the door is controlled by the two hinge links and the two stop screws (see
Figure 26). The stop screws should be adjusted so that both will be contacted when the contacting arm
is straight up and down. With the stop screws adjusted, the length of the hinge links can be changed to
provide complete closing of the door, and reasonable force on the handle to latch or unlatch the door.
Lengthen the links to reduce the force. Shorten the links to increase the force. With the door closed, both
links should be slightly tight to minimize rattling.
2. Door opening: After adjusting the hinge links for door closing, the handle link can be adjusted to obtain
maximum door opening (see Figure 26). Lengthen the link to open the door farther. Shorten the link to
open the door less. The maximum door opening is limited by the contacting arm hitting the stop. This stop
is non adjustable, and prevents over opening damage from occurring to the linkage.
3. Latches: Once the open and closed positions have been set, the latches can be adjusted (see Figure 26).
With the door closed, the latch link should be set so that the latch plate completely engages and contacts
the latch rod welded to the door. The latch plates should not be tight against the latch rod. They should
easily “wiggle”.
23