


S 3 5 0 DL O PE RATI ON M AN UAL
1514
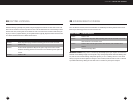
10 TUNING IN SHORTWAVE STATIONS
IF YOU ARE ALREADY
FAMILIAR WITH SHORTWAV E:
Fully extend the telescopic antenna and turn on
the radio. Set the AM/SW BAND switch to the
SW1, SW2 or SW3 position and the BANDWIDTH
switch to wide or narrow. SHORTWAVE 1, 2
or 3 appears in the display. Use the outer ‘fast’
tuning knob to quickly go to a desired frequency
that you already know or to the band that you
want to tune around in, then fine tune stations
with the inner ‘slow’ knob when needed. If a sta-
tion is so strong that audio distortion occurs,
reduce the gain level with the AM/SW RF
GAIN control knob by turning it
counter-clockwise.
IF YOU ARE NEW TO SHORT-
WAV E OR NEED A REFRESHER
(also see the section titled INTRODUCTION TO
SHORTWAVE, later in this manual) Fully extend
the telescopic antenna and turn on the radio.
Get close to a window and fully extend the tele-
scopic antenna. Follow the instructions below,
depending on day or night listening.
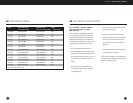
If it is daytime, turn the AM/SW BAND switch
to the SW2 position. Use the fast tuning knob
and tune to 15100 KHz. This is the beginning of
the shortwave 19 meter band, one of the three
best daytime bands, extending from 15100-15600
KHz. Using the slow tuning knob, tune through
this band, carefully listening for stations.
Also try the 13 meter band (21450-21850 KHz)
and 16 meter band (17480-17900 KHz),
both in SW3.
If it is night, turn the AM/SW BAND switch to
the SW1 position. Use the fast tuning knob and
tune to 5800 KHz. This is the beginning of the
shortwave 49 meter band, one of the four best
night bands, extending from 5800-6200 KHz.
Using the slow tuning knob, tune through this
band, carefully listening for stations. Also try the
25 meter band in SW2 (11600-12200 KHz), 31
meters in SW2 (9400-9900 KHz) and 41 meters in
SW1 (7150-7600 KHz).
NOTE: If there is interference from adjacent sta-
tions, place the BAND WIDTH control in the NAR-
ROW position. If there is no interference, leave it
in the WIDE position. If there is excess back-
ground noise, turn on the SW LPF switch, which
may minimize the noise. If a station is so strong
that audio distortion occurs, reduce the gain level
with the AM/SW RF GAIN control knob by turning
it counter-clockwise.
The Frequency Lock feature, described on page
13, also works with shortwave.
11 SETTING THE CLOCK
The S350DL's clock is a selectable 12-hour
AM/PM mode or 24-hour mode time system. To
toggle between 12 and 24 hour modes, turn off
the S350DL.Then, press the Hour button for
about 3 seconds until 12 or 24 flashes in the dis-
play. Then release the Hour button.When AM or
PM appears in the display, it is set in the 12-hour
AM/PM mode. If they are not in the display, it is
in the 24-hour mode.
The radio can be turned on/off to set the clock.
With the radio turned on/off, hold down the TIME
button for two seconds, then release it. The time
display will flash. While it is flashing press the
HOUR and MINUTE buttons to set the correct
time. After setting the correct time, immediately
press the TIME button to finalize the entry. If the
TIME button is not pressed, the display will auto-
matically finalize the entry after about five sec-
onds. While setting the time, the HOUR and
MINUTE buttons can be held down to advance
the time faster.
NOTE: When the radio is turned off, the display
panel shows the time. When it is turned on, it
shows a radio frequency. While on, pressing the
TIME button causes the display to change from
frequency to time for about three seconds, after
which it shows frequency again.
POWER FAILU RE BACKUP
FEATU RE
If batteries are in the S350DL and it is powered
via its AC adaptor, it will automatically switch to
battery use if there is an AC power failure.
12 USING THE SLEEP TIMER
The S350DL includes a sleep timer, which lets you
set the radio to turn off after an amount of time
of your choice. On the S350DL, the sleep timer is
automatically activated for 90 minutes whenever
the radio is turned on. After pressing the
POWER&SLEEP button to turn on the radio, notice
that ‘90’ appears in the display as well as the
SLEEP symbol.This means that
the radio’s sleep timer is engaged, allowing the
radio to automatically turn off after 90 minutes.
To change the amount of minutes that the radio
plays before automatically shutting off, press the
POWER&SLEEP button to switch on the radio.
After 90 appears, immediately do quick, short,
repeated presses on the POWER & SLEEP button
until the desired time is reached. Note that the
sleep timer changes from 90 to 75 to 60 to 45
to30 to15 to10 to 01 minutes and finally to off,
with each successive press.