


5
OPERATION
WARNING:
Be sure to read the fuel
information in the safety rules before you be-
gin. If you d o not understand the safety rules,
do not attempt to fuel your unit. Contact an
authorized service dealer.
FUELING ENGINE
WARNING:
Remove fuel cap slowly
when refueling.
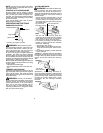
This engine is certified to operate on un-
leaded gasoline. Before operation, gasoline
must be mixed with a good quality synthetic
2-cycle air-cooled engine oil designed to be
mixed at a ratio of 40:1 (2.5%). A 40:1 ratio is
obtained by mixing 5 liters of unleaded gaso-
line with 0,125 liter of oil. DO NOT USE auto-
motive oil or boat oil. These oils will cause en-
gine damage. When mixing fuel, follow
instructions printed on oil container. Once oil
is added to gasoline, shake container mo-
mentarily to assure that the fuel is thoroughly
mixed. Always read and follow the safety
rules relating to fuel before fueling your unit.
IMPORTANT
Experience indicates that alcohol blended
fuels (called gasohol or using ethanol or
methanol) can attract moisture which leads to
separation and formation of acids during stor-
age. Acidic gas can damage the fuel system
of an engine while in storage. To avoid engine
problems, empty the fuel system before stor-
age for 30 days or longer. Drain the gas tank,
start the engine and let it run until the fuel lines
and carburetor are empty. Use fresh fuel next
season. Never use engine or carburetor
cleaner products in the fuel tank orpermanent
damage may occur.
HOW TO STOP YOUR UNIT
S To stop the engine, move the ON/OFF
switch to the OFF position.
HOW TO START YOUR UNIT
WARNING:
The trimmer head will
turn while starting the engine. Avoid any con-
tact with the muffler. A hot muffler can cause
serious burns.
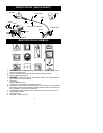
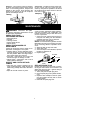
STARTING A COLD ENGINE (or a
warm engine after running out of fuel)
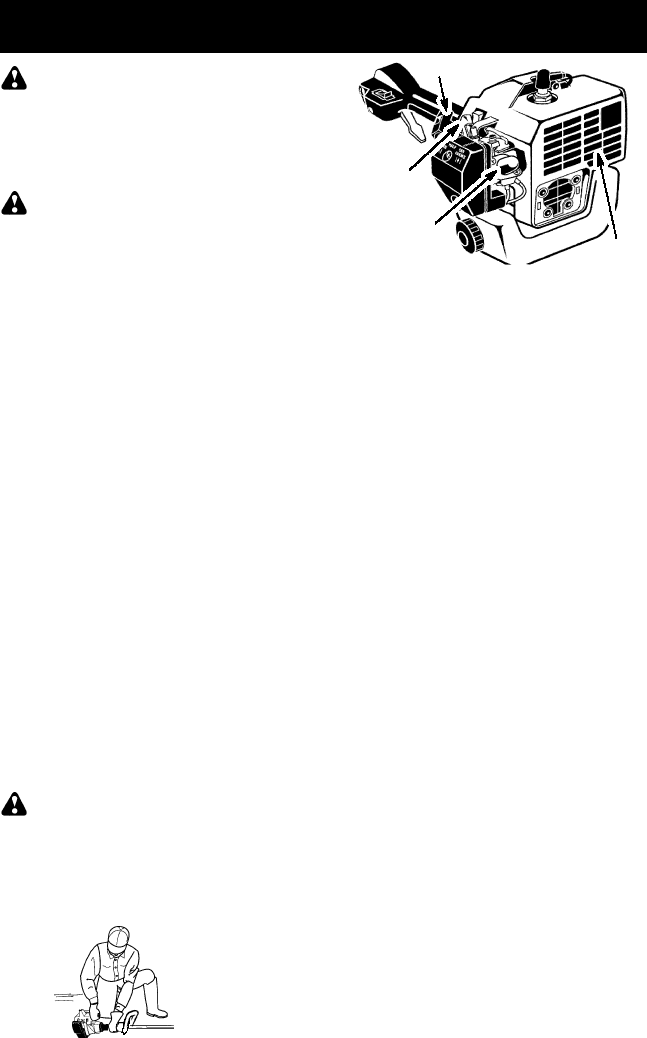
Starting Position
Choke
Lever
Primer Bulb
Starter Handle
Muffler
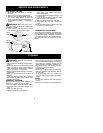
1. Set unit on a flat surface.
2. Move ON/OFF switch to the ON position.
3. Slowly press the primer bulb 6 times.
4. Move choke l ever to FULL CH O KE posi-
tion.
5. Squeeze and hold trigger through all re-
maining steps.
6. Pull starter rope handle sharply until en-
gine sounds as if it is trying to start, but do
not pull rope more than 6 times.
7. As soon as engine sounds as if it is trying
to start, move choke lever to HALF
CHOKE.
8. Pull starter rope sharply until engine runs,
but no more than 6 pulls. If the engine
doesn’t start after 6 pulls (at the HALF
CHOKE position), move the choke lever
to the FULL CHOKE position and press
the primer bulb 6times. Squeeze and hold
the t hrottle trigger and pull the starter rope
2 more times. Move the choke lever to the
HALF CHOKE position and pull the start-
er rope until the engine runs, but no more
than 6 pulls.
NOTE:
If engine still doesn’t start, it is
probably flooded. Proceed to STARTING
A FLOODED ENGINE.
9. Once the engine starts, allow it to run 10
seconds, then move the choke lever to
OFF CHOKE. Allow the unit to run for 30
more seconds at OFF CHOKE before re-
leasing the throttle trigger.
NOTE:
If engine dies with the choke le-
ver in the OFF CHOKE position, move the
choke lever to the HALF CHOKE position
and pull the rope until engine runs, but no
more than 6 pulls.
STARTING A WARM ENGINE
1. Move ON/OFF switch to the ON position.
2. Move the choke lever to the HALF
CHOKE position.
3. Squeeze and hold the throttle trigger.
Keep throttle trigger fully squeezed until
the engine runs smoothly.
4. Pull starter rope sharply until engine runs,
but no more than 5 pulls.
5. Allow engine to run 15 seconds, then
move the choke lever to the OFF CHOKE
position.