


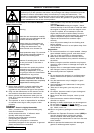


SAFETY PRECAUTIONS
13.Do not overspeed the engine or alter governor
settings. Excessive speed is dangerous and
shortens lawnmower life.
14.Disengage all blade and drive clutches before
starting. (page 6)
15.Keep hands and feet away from the cutting
means at all times and especially when
switching on the motor.
16.Do not tilt lawnmower when starting the engine
17.Do not put hands near the grass discharge chute
whilst engine is running.
18.Never pick up or carry a lawnmower while the
engine is running
19.Spark plug wire may be hot - handle with care.
20.Do not attempt any maintenance on your
lawnmower when the engine is hot.
21.Release the Operator Presence Control, to stop
the engine, and wait until the blade has stopped:-
- before leaving the mower unattended for any
period;
22.Release the Operator Presence Control, to stop
the engine, wait until the blade has stopped,
disconnect the spark plug lead and wait until the
engine has cooled:-
- before refuelling
- before clearing a blockage;
- before checking, cleaning or working on the
appliance;
- if you hit an object. Do not use your lawnmower
until you are sure that the entire lawnmower is in
a safe operating condition.;
- if the lawnmower starts to vibrate abnormally.
Check immediately. Excessive vibration can
cause injury.
23.Reduce the throttle setting during engine shut
down and, if the engine is provided with a shut-
off valve, turn the fuel off at the conclusion of
mowing.
Maintenance and storage
1. Keep all nuts, bolts and screws tight to be sure
the lawnmower is in safe working condition.
2. Check the grassbox/grassbag frequently for
wear or deterioration.
3. Replace worn or damaged parts for safety.
4. Only use the replacement blade, blade bolt,
spacer and impeller specified for this product.
5. Never store the lawnmower with fuel in the tank
inside a building where fumes can reach an
open flame or spark.
6. Allow the engine to cool before storing in any
enclosure.
7. To reduce fire hazard, keep the engine, silencer,
battery compartment and fuel storage area free
of grass, leaves or excessive grease.
8. If the fuel tank has to be drained, this should be
done outdoors.
9. Be careful during adjustment of the machine to
prevent entrapment of the fingers between the
blade and fixed parts of the machine.
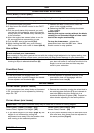
ASSEMBLY INSTRUCTIONS
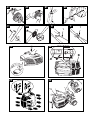
1. Select one of the holes in the mounting plate and
note its position, as all four wheels will need to be
adjusted to the same position (A1).
2. Locate the fixing bolt through hole in hub cap,
wheel and selected hole in mounting plate.
3. Turn the wheel hub in a clockwise direction until
the wheel assembly is securely located to the
deck (A2).
WHEEL ASSEMBLY (WHERE NECESSARY)
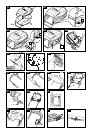
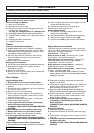
Lower Handles
1. If your product has Cutting Height with levers
(see Adjustment, page 5), ensure the lever is at
the Highest Cut Height before following steps 2 &
3.
2. Insert each side of the lower handle into deck as
shown in Fig B1.
3. Push each side of the handle firmly down until it
is located securely into the deck (B2).
4. Insert screw through the washer and into holes
using a pozidrive screwdriver and tighten fully
into deck as shown in Fig B2.
Upper Handles
1. Fit the upper handle to the lower handle with the
bolts, washers and handle knobs. (C1)
2. Fit the cables to the handles with the cable ties
provided, making sure the cables are not trapped
between the upper and lower handles.
Handle Adjusters fitted to product
1. Adjust handle assembly to the most comfortable
operating position and tighten handle adjuster
knob (C2) on both sides of the product.
HANDLES
ENGLISH - 2