


STARTING AND STOPPING
USE
BLADE, B
RAKE, CLUTCH (BBC)
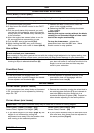
Forward drive is engaged and disengaged with the Power Drive lever at the top of the handle (Q2-B).
If you have a BBC model you will be able to keep the engine running while the brake is on.
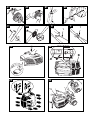
1. Connect the spark plug lead.
2. If fitted move the throttle control to the FAST
position.
3. Pull the recoil starter fully towards you until
you feel the full resistance, return the handle
slowly then pull the handle firmly towards you
to its full extent.
4. After the engine has started, allow to run for
30 seconds before commencing to use.
5. Pull the BBC arm to the handle (Q1).
6. While holding the BBC arm, push forward
BBC control lever until a click is heard (Q2-A).
7. Release the BBC control lever which will
return to its original position.
8. Releasing the BBC arm will stop the blade
from rotating.
Please note:
Leaving the engine running without the blade
rotating for an extended length of time could
lead to the engine overheating.
To stop the lawnmower - release the
powerdrive lever then the BBC arm. Move
throttle control to stop position.
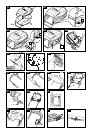
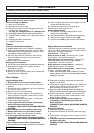
1. Start mowing from the outside edge of the lawn,
mowing in strips in alternate directions (R).
2. Mow twice a week in the growing season,
your lawn will suffer if more that one third of its
length is cut at one time and this may also
result in poor collection.
HOW TO MOW
Please Note:-
Do not overload your Lawnmower
When mowing in long thick grass a first cut with the cutting height adjusted to its highest setting, see
Cutting Height, will help reduce motor overload and will help prevent damage to your lawnmower.
POWER
DRIVE CABLE
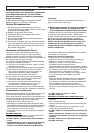
Ensure the Powerdrive cable is not twisted and runs freely down the handles.
1. If the drive does not engage when the
powerdrive lever is pulled towards the handle
screw adjuster anti-clockwise (S).
2. Screw adjuster in opposite direction if the
powerdrive does not disengage with the
powerdrive lever free (S).
ADJUSTMENT
If your lawnmower has wheel hubs as illustrated
in T1, the height of cut is adjusted by following
steps T1- T3.
1. Remove the wheel by turning the wheel hub in
an anticlockwise direction (T1) and relocate in
new hole (T2) turning the wheel hub in a
clockwise direction to tighten (T3). Repeat for
other wheels adjusting to the same position.
CUTTING HEIGHT (WITHOUT LEVERS)
C
UTTING HEIGHT (WITH LEVERS)
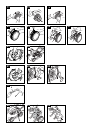
1. If you have Height of Cut levers (Figs. V), the
height of cut is altered by pulling the
adjustment lever away from the location slots
and moving to the selected position.
2. If your petrol wheeled rotary is fitted with more
than one lever then these must be adjusted to
the same position (Figs V).
Please Note : Your petrol wheeled rotary may be fitted with a mixture of cutting heights.
Levers Fitted, Lowest Cut Height - (V1)
Levers Fitted, Highest Cut Height - (V2)
Levers Fitted, Semi Central - (V3)
Levers Fitted, Central - (V4)
ENGLISH - 5