


nism. In case of emergency you need to be
able to release the machine quickly.
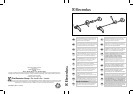
The harness is equipped with a fasten-release
mechanism. The harness enables the operator to
support the machine during use (see “Safety pre-
cautions”, B7).
ENGLISH - 5
Preparation of the mixture
Do not use any other type of fuel than the
type recommended in this manual. This
machine is equipped with a two-stroke engine
and should therefore be fueled with a mixture of
unleaded gasoline (with a minimum octane rating
= 90) and fully synthetic oil specific for two-speed
engines that use unleaded gasoline in the propor-
tions indicated in the table on the cover, fig. D.
Control the specifications of the oil shown
on the package; the use of oil lacking the
specifications expressly indicated in this manual
could cause serious damage to the engine!
To obtain the best mixture, pour the oil into an
approved container first, followed by the gasoline,
and shake the container well (every time you take
fuel out of it).
The characteristics of the mixture tend to deterio-
rate in time, so you should only prepare as much
mixture as you are going to need (the use of
deteriorated fuel can seriously damage the
engine).
Filling the tank
Clean the area around the fuel cap before remov-
ing it, to prevent any impurities from contaminat-
ing the fuel. Take the cap off the fuel container
carefully. Unscrew the cap on the fuel tank and fill
it with the necessary quality, using a funnel.
During use, to prevent problems in starting the
engine again, we strongly recommend that you
avoid letting the fuel run out in the tank.
Fuel storage
Store the fuel in a cool, well-ventilated
place, in an approved fuel storage container.
Never store the engine with fuel in the tank in a
poorly ventilated place where the fumes produced
by the gasoline could propagate and reach a fire,
candle, burner or furnace pilot light, water heater,
dryer, etc. Never store excessive quantities of
fuel.
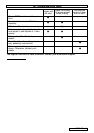
D. Fuel Mixture
7 14 15
14 15
14 15
E. Assembly/disassembly
E1. Delta grip
For your safety, fasten the delta handle in front of
the label placed on the shaft at a distance of at
least 11 cm from the rear grip. The handle should
be fastened in a comfortable working position. If
you are using sawtooth blades, the grip distance
should be moved by at least 36 cm. The safety
pole guard should be mounted using the acces-
sories supplied and in the configuration shown in
the figure,in contact with the delta handle.
E2. Double handled grip (A)
The grip (A) can be adjusted to suit the needs of
the operator by moving it forward or backward.
Loosen the knob, place the handle in the desired
position then tighten the knob again.
CAUTION! The handle assembly (A) can be
folded parallel to the transmission shaft to
facilitate transport and storage of the machine.
Loosen the knob, turn the support, by 90° clock-
wise, fold the handle (A) in the desired position
and tighten the knob.
E3. Double Handle (B)
Adjust and secure double hand clamp by tighten-
ing the screws.
E4. Fitting guard on line cutter head and grass
cutting blade
Fit the safety guard (A) against the gearbox (I)
position the lower clamp (G) in the housing under
the shield and the upper clamp (F) over the shaft.
Insert and tighten the screws (H).
2 3 4
2 3 4