


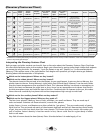


Where Will the Planets Be When…?
After students have arranged the planets in their current positions, use the Heliocentric Longitude Chart to see
where the planets will be on other dates. Try the end of the school year, different winter holidays, or perhaps a
student’s birthday.
Creating a Living Solar System Model
Younger students will enjoy “acting out” the movement of the solar system. This activity works best outdoors, in a
paved area with plenty of space.
1. Spend time before class making nine signs, one for the sun and one for each planet. If you wish, draw a 10th
sign for Pluto. Write each planet’s name and symbol on a large card or on a sheet of paper. The symbols are
listed in the Planetary Features Chart on page 4. (The sun’s symbol is located on the sun sphere.)
2. Begin the lesson by drawing a circle about two feet in diameter on the pavement with chalk. This circle
will be your sun’s position.
3. Next, draw another circle surrounding it. Draw seven more circles, each encircling the previous one. These
circles will represent the orbits of the planets. Space the circles widely enough so that students walking
along the orbits will not bump into each other. If you wish, draw an extra circle for Pluto.
4. Choose students to enact the roles of the sun and the planets. Pass out the cards. The “sun” should stand
in the central circle. Each “planet” will walk along its orbital path around the sun.
5. Here’s the tricky part: The planets and the sun rotate on their axes. They all spin eastward, except for
Venus, which spins retrograde, or backward. The student portraying Venus should spin to the right,
while the other students spin to the left.
6. Tell your “planets” to spin slowly or they’ll dizzily spin out of orbit! In reality, the planets never stop moving,
but ask your “planets” to rest if they get dizzy!
Calculating Revolution Periods for the Planets
In the Motorized Solar System model, all of the planets take the same amount of time to make one revolution
around the sun. In reality, the planets orbit the sun at very different speeds. In this activity, students will time Earth’s
revolution, then use the information in the Planetary Features Chart to calculate what the revolution times for
other planets should be.
1. Position Earth at 0º longitude.
2. Start timing (with a stopwatch or digital watch) as you switch on the Motorized Solar System.
3. Write down how long it takes Earth to make a complete revolution and reach 0º again.
4. The Planetary Features Chart lists that it takes 88 Earth days for Mercury to orbit the sun, and 365 days
for Earth to orbit the sun. Multiply your recorded time by . Your result will be the amount of time it
would take Mercury to complete one orbit of the sun if Earth used your recorded time and if the relative
speeds in the model were accurate.
5. Relative revolution periods can be found for other planets in the same way, but make sure students don’t
confuse years with days. For example, it takes Neptune 164 Earth years to orbit the sun. There’s no need
to convert that figure to Earth days, since we know that 365 days equals one Earth year. Simply multiply
your recorded time by 164.
Locating the Planets in the Night Sky
Using the Heliocentric Longitude Chart on page 2, choose a particular day and align the planets on their support
rods according to their degree locations. Look at Earth’s location. The portion of Earth always pointed at the sun
represents noontime or midday. Taking a straight-edge, veer off to the left—keeping the sun below the horizon,
represented by the straight-edge—from Earth. Any planets that are above the horizon should be visible in the night
sky. Depending on the day, you could see Saturn, Jupiter, Mars, Venus, or Mercury with the unaided eye. Viewing
depends on clear, dark skies.
Classroom Activities
88
365