


10
102514
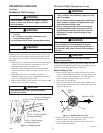
OPERATING CHAIN SAW
Continued
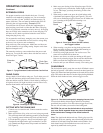
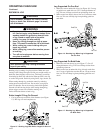
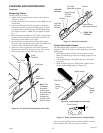
Figure 14 - Limbing A Tree
Limbing is removing branches from a fallen tree. Make sure
your footing is firm. Keep feet apart. Divide your weight
evenly on both feet. Do not remove larger limbs under tree that
support log off ground. Remove each limb with one cut (see
Figure 14). Clear cut limbs from work area often. This will
help maintain a safe work area.
Make sure you start your cut where limb will not pinch saw
during cutting. To avoid pinching, start cut on freely hanging
limbs from above limb. Start cut on limbs under tension from
under limb. If pinch occurs, turn saw off, lift limb, and remove
saw.
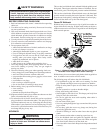
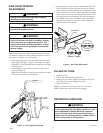
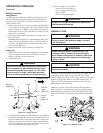
Felling Procedure
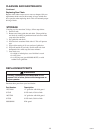
Felling Notch
A properly placed felling notch will determine direction tree
will fall. Place felling notch on side of tree in direction you
want tree to fall (see Figure 13). Follow directions below to
create a felling notch.
1. Make lower notch cut as close to ground as possible. Hold
saw so guide bar is horizontal. Cut 1/3 the diameter of tree
trunk (see Figure 13).
Note:
Always make this horizontal
lower notch cut first. If you make this cut second, tree can
pinch chain or guide bar.
2. Start upper notch cut the same distance above first cut as
first cut is deep.
Example:
If lower notch cut is 20 centimeters deep, start
upper notch cut 20 centimeters above it. Cut downward at
45° angle. The upper notch cut should meet end of lower
notch cut (see Figure 13).
3. Remove tree trunk wedge created by notching cuts.
Felling Cut
1. Make felling cut five centimeters higher than lower notch
cut and on opposite side of tree (see Figure 13). Keep
felling cut parallel to lower notch cut.
2. Cut towards notch.
4. When tree begins to fall, quickly
• remove saw from felling cut
• release trigger to turn saw off
• put saw down
• exit area using retreat path
!
WARNING ICON G 001
WARNING
Be alert for falling overhead limbs. Watch your
footing while exiting area.
LIMBING A TREE
!
WARNING ICON G001
WARNING
Do not cut all the way through tree. Leave about
five centimeters of tree diameter uncut directly
behind felling notch (see Figure 13). This uncut
portion acts as a hinge. The hinge helps keep
tree from twisting and falling in wrong direction.
Hinge
Direction of Fall
3rd Cut -
Felling Cut
2nd Cut -
Upper
Notch Cut
1st Cut -
Lower
Notch Cut
5 cm
5 cm
!
WARNING ICON G 001
WARNING
Avoid kickback. Kickback can result in severe
injury or death. See
Kickback
, page 3 to avoid
risk of kickback.
!
WARNING ICON G001
WARNING
When cutting limb that is under tension, use
extreme caution. Be alert for wood springing
back. When wood tension is released, limb could
spring back and strike operator causing severe
injury or death.
!
WARNING ICON G001
CAUTION
Seek professional help if facing conditions
beyond your ability.
3. As felling cut nears hinge, tree should begin to fall.
Note:
If
needed, drive wedges into felling cut to control direction of
fall. If tree settles back and pinches chain, drive wedges into
felling cut to remove saw. Only use wedges made of wood,
plastic, or aluminum. Never use wedge made of steel. This
could cause kickback and damage to chain.
Figure 13 - Felling A Tree