


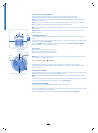


7
6) Automatic Shut Down
The DOLPHIN will automatically shut down either after the cleaning cycle ends or when battery capacity drops
below the lowest allowable level, whichever comes first.
As soon as the DOLPHIN 'senses' that the batteries are about to empty, it will automatically move towards a wall
in order to facilitate its removal from the pool. Note that DOLPHIN batteries are charged before starting a new
cleaning cycle (see 3 page 3).
The DOLPHIN has an advanced computerized Self-Protecting Diagnostic Mechanism. It will automatically shut
off if it encounters a problem. The performance history of the DOLPHIN is stored in its memory.
It can be accessed by an approved DOLPHIN Service Center only.
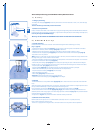
6.1) Removal of DOLPHIN from pool
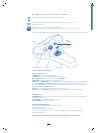
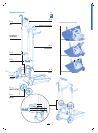
After the cycle time is completed press the ‘OFF’ button on the DOLPHIN float.
• Pull the DOLPHIN to the surface by gently pulling the float and the cable [Fig E-1].
Note:
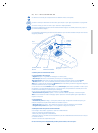
If the DOLPHIN has stopped in mid-pool, use the Remote Control Unit Joystick to maneuver the DOLPHIN
to the pool wall. Alternatively, use DOLPHIN Pike to hook onto the float and gently reel in the DOLPHIN to the
surface [Fig E-2].
Note:
The DOLPHIN Pikes' length can be extended by connection to a standard pool accessory extension pole
or tele-pole (brush or leaf skimmer).
• When DOLPHIN handle can be easily reached, grab the handle and turn the DOLPHIN so that one of the brushes
leans against the pool wall [Fig F].
• Lift the DOLPHIN out of the water by the handle only – NEVER BY THE FLOAT OR THE CABLE.
• By pulling on the handle, lever the DOLPHIN over the pool edge, until it is lying on its side [Fig G] and all the
water has flowed out.
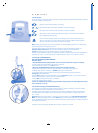
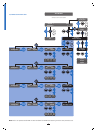
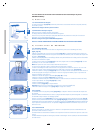
• Place the DOLPHIN upside down, release the 2 locking clips [8 page-10] [Fig H] and remove the bottom lid
assembly [9 page-10] [Fig I].
• Remove the 2 filter bag clips [10 page-10] and the filter bag [11 page-10].
• Turn the filter bag inside out and wash thoroughly with a garden hose [Fig J].
The bag may be laundered using a regular synthetic cycle. This should be done at least once every 2 months.
• Clean bottom lid inlet flaps, the springs and underneath the locking clips.
• Refit the filter bag with the tag on the outside positioned centrally along the length side of the bottom lid
[Fig K ].
• Stretch the elastic trim of the bag over the 2 metal frames and over the lip of the bottom lid.
• Gather all the excess filter fabric into the center of the metal frames.
• Gather the fabric along the top of the frames so that the corners of the bag are adjacent to the corners of the
frames.
• Install a black filter bag clip over the top of the frames [Fig K].
• Install the bottom lid assembly in the body and lock it in place.
7) Periodical Removal of Debris from the
Moving Parts (Tracks, Wheels, Impeller)
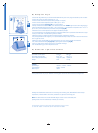
Warning!
PRESS THE
‘OFF’
BUTTON ON THE FLOAT BEFORE REMOVING IMPELLER TUBE
[12 page-10].
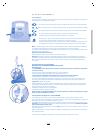
• The impeller can be cleaned by twisting and removing the impeller tube [Fig L].
• Remove debris or hair that has clogged the impeller [13 page-10].
The impeller can be unscrewed by means of a Philips screwdriver.
• Remove the debris that has accumulated between tracks [14 page-10] and wheels [15 page-10 ].
L
Fig
K
Fig
Tag
Clip
H
I
J
Fig
Fig
Fig
G
Fig
GF
Fig
G
E
Fig
E
Fig
1
2