


Page 13
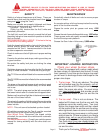
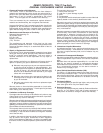
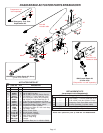
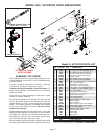
WHITE Ground
BROWN Tail Lights and License Plate Light
YELLOW Left Turn and Stop
GREEN Right Turn and Stop
COLOR CODE FOR WIRING HARNESS
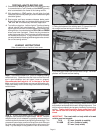
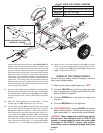
harness at the fender pocket, the wire ends SHOULD NOT be
stripped. Use the wire connectors to make all contacts. Lay
the wire in the connector, pinch securely with a pliers, closing
the wire connector. Splice the white wire of the pigtail to the
white ground wire from the fender. Splice the black wire to the
brown wire. Splice the green (or yellow) wire to the red wire
of the pigtail. The connections are made on the outside of the
fender pocket and pushed into the fender pocket through the
pocket hole. Pull the wires back into the fender pocket and
push the strain relief into the fender with the wire loom close
to the clip. Wrap the loom hanger tie around the wire loom and
insert the peg into the fender.
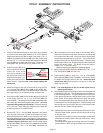
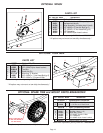
11. Push the round rubber light seal (#26) into the light pocket.
Be sure the lip is secured in the light housing. Plug the pigtail
into the fender light. Push the round light (#27) into the rubber
seal until it snaps in firmly. Wire the other fender in the same
manner.
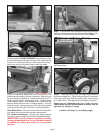
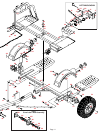
12. Attach the tire/rim assembly to the mainframe. Use the
supplied lug nuts (#28) and torque to 75 - 80 ft. lbs.
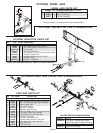
13. Lay the bracing struts (#29) out along the tow dolly tongue
with the back end (the end with the larger hole in it) of the
bracing strut toward the mainframe. Loosely bolt the back of
each bracing strut to the trailer frame as shown using 1/2" x
1-1/2" grade 5 bolt (#30), flatwasher (#31), pivot bushing
(#32) and locknut (#33). Hold up the front end (the end with
the smaller hole) of each bracing strut to the tongue, align
holes and secure with a two 5/8" x 1-1/4" epoxied bolt (#34).
Torque the 1/2" x 1-1/2" bolt with the pivot bushing to 75 ft. lbs.
Yellow or
Green
White
White Ground Wire to
Fender
WIRING DIAGRAM FOR THE AUTO
TRANSPORT FENDER
Yellow/Brown or
Green/Brown
Wire
Connector
White
Red
Black
Triple Wire Plug
from Light
Brown
WIRING OF THE TOWING VEHICLE
Connect wiring to towing vehicle, keeping in mind the
color code indicated below.
1. Make certain towing vehicle lights are "OFF".
2. Connect YELLOW wire to left turn signal and stop
wire in the left rear of towing vehicle with the wire
splicer (01883 X) supplied.
3. Connect GREEN wire to the right turn signal and
stop wire.
4. Connect BROWN wire to tail light wire.
5. VERY IMPORTANT - connect WHITE wire to frame
body of towing vehicle. This is the common ground,
and a clean metal - to - metal contact must be made.
CAUTION: Many flashers for vehicle turn signals
will not carry the additional load of TOW-IT turn
signals. If normal operation does not occur when
connected to the TOW-IT, a heavy duty replace-
ment flasher may be obtained through auto parts
outlets.
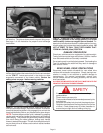
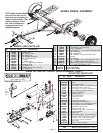
14. Attach the two 24" transport safety chains (#35) to the two
holes in the angle located under the tongue using two 7/16"
x 1-1/4" grade 5 bolts (#36), flatwashers (#37), and locknuts
(#38). Torque bolts to 50 ft. lbs.
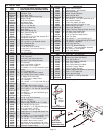
21
21
22
22
23
23
24
25
25
24
26
27
28
29
29
30
31
32
33
34
34
35
36
37
38
35