


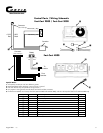

TRACTOR CAB INC.
August 2001 1167 7
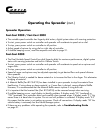
Operating the Spreader (cont.)
Spreader Operation
Fast-Cast 2000 / Fast-Cast 3000
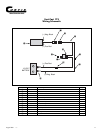
• The variable speed controller has finger-tip dial action, digital system status with warning protection.
• To start, press power switch on controller and spreader will accelerate to speed set on dial.
• To stop, press power switch on controller to off position.
• Adjust speed of spinner by using dial on right side of controller.
• If audible beeping occurs, read the sequence and refer to page 21.
Fast-Cast 4000
• The Dual Variable Speed Control has dual finger-tip dials for maximum performance, digital system
status with warning protection and built-in Vibrator Switch.
• To start, press power switch on controller and spreader will accelerate to speed set on spinner and
auger dials.
• To stop, press power switch on controller to off position.
• Speed of auger and spinner may be adjusted separately to get desired flow and spread distance
from spreader.
• The Vibrator Switch is needed for dense material or to increase the flow to the Auger. This eliminates
bridging of material.
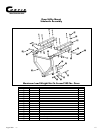
• A Material Baffle (Part #1CS4P19) has been installed in your spreader to stop fine material from
free-flowing. If using dense or damp material, or if more flow is desired, remove Material Baffle.
However, it is recommended that the Material Baffle remain inplace if using bulk salt.
• It is important that the Inverted Vee (Part #1CS4P18) not be removed except when servicing.
• If audible beeping occurs, read display to identify problem. If display reads “OL” (overload) or
“OH” (overheat). Shut controller down and carefully clear jammed auger. If display reads “E1“ this
means there is a dead short in system. Do not use until problem is corrected. If display reads “E 0”
this means that the motor is not getting any power. Check all connections. If display reads “LB” the
vehicle battery is extremely low and could damage system.
• If there are any problems while operating the spreader, refer to Troubleshooting Guide
on page 21.