


TRACTOR CAB INC.
August 2001 1169 9
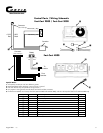
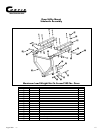
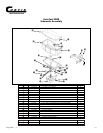
1. Install foam tape on bottom of motor enclosure/frame assembly.
2. Bolt bottom cover assembly on to motor enclosure. Make sure 2'' square tube faces the rear.
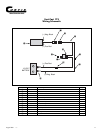
3. Attach bulkhead cable fitting onto cable outer jacket. Using pliers to hold the cable, thread fitting onto jacket with a
wrench. Be careful not to bend or kink cable. Important: To maximize the life of the cable and prevent corrosion, apply
a small amount of oil to the inner cable.
3a. If you need to reduce the cable length, remove inner cable by twisting the T-handle counter clockwise and pull wire out
of cable jacket, and trim to desired length. Make note of the amount of wire that extends beyond outer jacket. You will
need to maintain this length for proper operation.
3b. Optional* You may run the cable through either the left or right side of rear spreader frame. There are two holes
located along the back side of ther rear upper horizontal support. This would be used to keep cable routed away from
other equipment or to take up any slack in cable. Also this will keep cable from being kinked if mounted on a pickup
truck.
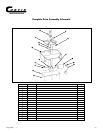
4. Attach cable assembly to the side and insert fitting into rear gate deck hole. Make sure you have the first jam hex nut
threaded onto the fitting.
4a. Once cable is inserted through rear gate deck, slide star washer and second jam nut over cable fitting. Leave these
loose for now.
5. Locate special 5/16'' hex bolt with a small hole drilled in it. Insert bolt through slide tab. The hole in bolt must be as
close to being in line with the cable as possible.
6. Rotate hex bolt until hole aligns with the cable. Insert cable through hole. Thread lock washer and hex nut on. Do not
tighten yet.
7. Make sure gate is at full close and that the cable is at full close. Once this is done, tighten hex bolt on gate slide, then
tighten cable assembly on rear gate deck. This will insure that the gate slide can seal off hopper 100%.
8. Test gate travel by pulling and pushing the T-handle. The cable assembly has a twist-lock feature. Turning clockwise
locks the gate into position, turning coutner clockwise allows gate to move back and forth.
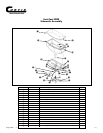
9. Install nylon lid.
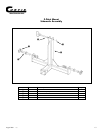
10. Mount spreader into a 2'' receiver type tube, align holes on mount and spreader and install 4'' locking pin.
Fast-Cast 175 Assembly Instructions