17
MAINTENANCE AND
SERVICE
WARNING:
Disconnect the spark plug wires or remove the
key from the ignition to prevent the engine
from accidentally starting before performing
any maintenance on this mower.
A. Cleaning your Deck
Use the Deck Wash System to rinse grass clip-
pings fro the deck’s underside and prevent the
buildup of corrosive chemicals. Complete the fol
-
lowing steps after each mowing:
IMPORTANT: Make certain the machine’s dis-
charge chute is directed away from people, chil-
dren, animals, and your house, garage, parked
cars, etc.
a. Drive the machine to a level, clear spot on
your lawn, near enough to a water faucet
(spigot) for your garden hose to reach.
b. Make sure that the PTO (mower deck
blade engage) control is in the “OFF” posi
-
tion.
c. Move shift lever or speed control into the
“Neutral” position.
d. Set the parking brake, and turn the ignition
key to the “STOP” position to stop the
engine.
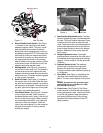
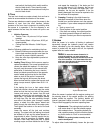
e. Thread hose coupler (packaged with this
manual) onto the end of your garden hose.
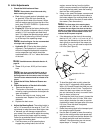
See Figure 6.
f. Attach the hose coupler to the water port
on your mower deck’s surface. See Figure
6. Turn the water on.
g. While sitting in the machine operator’s
position, re-start the engine and place
throttle lever in the Fast (rabbit) position.
h. Move the PTO control to the “ON” position.
i. Remain in the machine operator’s position,
and with the mower deck engaged for a
minimum of two minutes per wash out,
start with the trim (operator’s left) side, and
allow the underside of the cutting deck to
thoroughly rinse.
j. Move the PTO control to the “OFF” posi-
tion.
k. Turn the engine off.
l. Turn the water off, and detach the hose
coupler from the water port on your mower
deck.
m. Clean up the grass clippings and other
materials washed from underneath the
mower deck, and dispose of them properly.
Hose Coupler
(Shown without
Hose Attached)
Water Port
Figure. 6
B.Mower Deck
1. Removing the Mower Deck:
a. Apply the parking brake. Remove ignition
key and both spark plug caps.
b. Lower the cutter deck to the lowest setting
and capture the lift pedal by placing the
height of cut clevis pin into the “Lock” hole.
c. Remove tension of the PTO belt by moving
the belt tensioning spring.
Note: There is a certain amount of spring
tension due to the weight of the deck. When
removing the lift linkage from the deck the ten
-
sion of the springs will go from the deck to the
deck lift pedal. Not capturing the deck lift
pedal while removing the lift linkage from the
deck will cause it to snap back.
d. Detach the mower drive belt.
e. Remove the four hair pins from the right
and left side of the mower. Shift the deck
forward until the Trailing Link is free and
you are able to remove the deck.
f. Turn front caster wheels outward.
g. To install reverse the process
2. Changing a Blade:
a. Remove the key from the ignition and dis-
connect the spark plugs.
b. Jack up the front of the mowing deck about
one foot and block it in that position.
c. Wrap a rag around one end of the blade
and grasp it to prevent it from turning, or
secure the blade by placing a block of
wood between the blade and the deck
housing.
d. Use a 1-1/8" socket wrench on the pulley
side of the spindle bolt.
e. Remove the hex nut at the blade using a 1-
1/8" wrench.


