


BLADE REPLACEMENT
_WARNING: The blade will contin-
ue to spin after the engine stops or af-
ter the throttle trigger has been re-
leased. Toavoid serious injury, make
sure the blade has stopped coasting
and disconnect the spark plug before
performing work on the blade.
WARNING: Wear protective
gloves when handling or performing
maintenance on the blade to avoid
injury. The blade is sharp and can cut
you even when it is not moving.
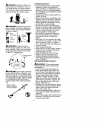
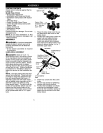
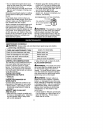
,/ ocking Lever
GEARBOX
1. To remove the blade, push in lock-
ing lever and hold.
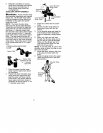
2. Rotate blade nut until the locking
lever falls into one of the grooves
in the dust cup.
3. Continue to hold in locking lever.
This will keep the shaft from turn-
ing while loosening the blade nut.
4. Loosen blade nut by turning clock-
wise as you are facing the nut.
5. Remove the blade nut, both wash-
ers, and the blade from the blade
shaft. Leave the dustcup on the
gearbox.
6. Install new blade and retaining
washer onto the threaded shaft ex-
tending from the gearbox (blade
must be between the dust cup and
the retaining washer). Make sure
the raised part of the retaining
washer is facing the gearbox, and
the raised area fits into the hole in
the center of the blade.
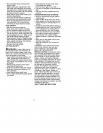
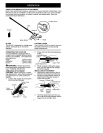
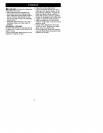
Gearbox
Shield
\
Dust Cu Threaded Shaft
Blade
Retaining
Washer
Cupped__.
Washer
_-q-_ Nut
7. Place the cupped washer onto the
shaft. Make sure the cupped side
of the washer is toward the blade.
8. Install blade nut by threading onto
the shaft counterclockwise as you
are facing the nut.
NOTE: Make sure all parts are in place
as illustrated, and the blade is sand-
wiched between the dust cup and the
retaining washer. There should be no
space between the blade and the dust
cup or the retaining washer.
9. Push in locking lever and hold.
10. Rotate blade nut until the locking
lever falls into one of the grooves
in the dust cup.
11. Continue to hold in locking lever.
This will keep the shaft from turning
while tightening the blade nut.
12. Tighten blade nut firmly with a
wrench.
13. Release locking lever.
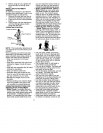
14. Turn blade by hand. If the blade
binds against the shield, or ap-
pears to be uneven, the blade is
not centered, and you must rein-
stall.
10