


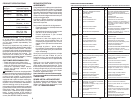

14
ADD GASOLINE
• Fill fuel tank to bottom of filler neck. Do not
overfill. Use fresh, clean, regular un lead ed
gasoline with a minimum of 87 octane.
(Use of leaded gasoline will increase
carbon and lead oxide deposits and reduce
valve life). Do not mix oil with gasoline.
Purchase fuel in quan ti ties that can be used
within 30 days to ensure fuel freshness.
CAUTION: Wipe off any spilled oil or fuel.
Do not store, spill or use gasoline near an
open flame.
IMPORTANT: When operating in tem-
peratures below 32°F(0°C), use fresh, clean
winter grade gas o line to help ensure good
cold weather start ing.
CAUTION: Alcohol blended fuels (called
gasohol or using ethanol or methanol) can
attract moisture which leads to separation
and for ma tion of acids during storage. Acidic
gas can damage the fuel system of an engine
while in storage. To avoid engine problems,
the fuel system should be emptied before
stor age of 30 days or longer. Drain the gas
tank, start the engine and let it run until the
fuel lines and carburetor are empty. Use fresh
fuel next season. See Storage In struc tions
for additional information. Never use engine
or carburetor cleaner products in the fuel tank
or permanent damage may occur.
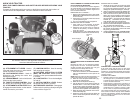
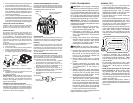
TO START ENGINE
When starting the engine for the first time or
if the engine has run out of fuel, it will take
extra cranking time to move fuel from the
tank to the engine.
1. Ensure freewheel control is in the trans-
mis sion en gaged position.
2. Sit on seat in operating position, depress
clutch/brake pedal and set parking brake.
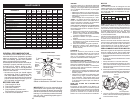
BEFORE STARTING THE ENGINE
CHECK ENGINE OIL LEVEL
The engine in your tractor has been shipped,
from the factory, already filled with sum mer
weight oil.
1. Check engine oil with tractor on level
ground.
2. Remove oil fill cap/dipstick and wipe
clean, reinsert the dipstick and screw cap
tight, wait for a few seconds, remove and
read oil level. If nec es sary, add oil until
“FULL” mark on dipstick is reached. Do
not overfill.
• For cold weather operation you should
change oil for easier starting (See the oil
viscosity chart in the Main te nance sec tion
of this man u al).
• To change engine oil, see the Main te nance
section in this manual.
3. Place motion control lever in neutral
position.
4. Move attachment clutch to dis en gaged
position.
5. Move throttle control to choke po si tion.
NOTE: Before starting, read the warm and
cold starting procedures below.
6. Insert key into ignition and turn key
clock wise to start position and release
key as soon as engine starts. Do not run
starter continuously for more than fifteen
sec onds per minute. If the engine does
not start after several attempts, move
throt tle control to fast position, wait a
few minutes and try again. If engine still
does not start, move the throttle control
back to the choke position and retry.
WARM WEATHER STARTING
(50°F/10°C and above)
7. When engine starts, move the throt tle
control to the fast position.
• The attachments and ground drive can
now be used. If the engine does not accept
the load, restart the en gine and allow it to
warm up for one minute using the choke
as de scribed above.
COLD WEATHER STARTING
(50°F/10°C and below)
7. When engine starts, leave throttle control
in choke position until engine warms up
and begins to run roughly. Once rough
running begins, im me di ate ly move the
throttle control to the fast position. Engine
warm-up may take from several seconds
to several minutes (the colder the tem-
per a ture, the longer the warm-up).
AUTOMATIC TRANSMISSION WARM UP
Before driving the unit in cold weath er, the
trans mis sion should be warmed up as follows:
1. Ensure the tractor is on level ground.
2. Place the motion control lever in neutral.
Release the parking brake and let the
clutch/brake slowly re turn to operating
po si tion.
3. Allow one minute for trans mis sion to warm
up. This can be done during the engine
warm up period.
• The attachments can also be used dur-
ing the engine warm-up period after the
trans mis sion has been warmed up.
NOTE: If at a high altitude (above 3000 feet)
or in cold temperatures (below 32°F/0°C)
the carburetor fuel mixture may need to be
adjusted for best engine performance (see
“TO ADJUST CARBURETOR” in the Service
and Adjustments section of this manual).
51
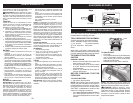
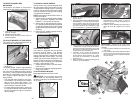
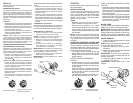
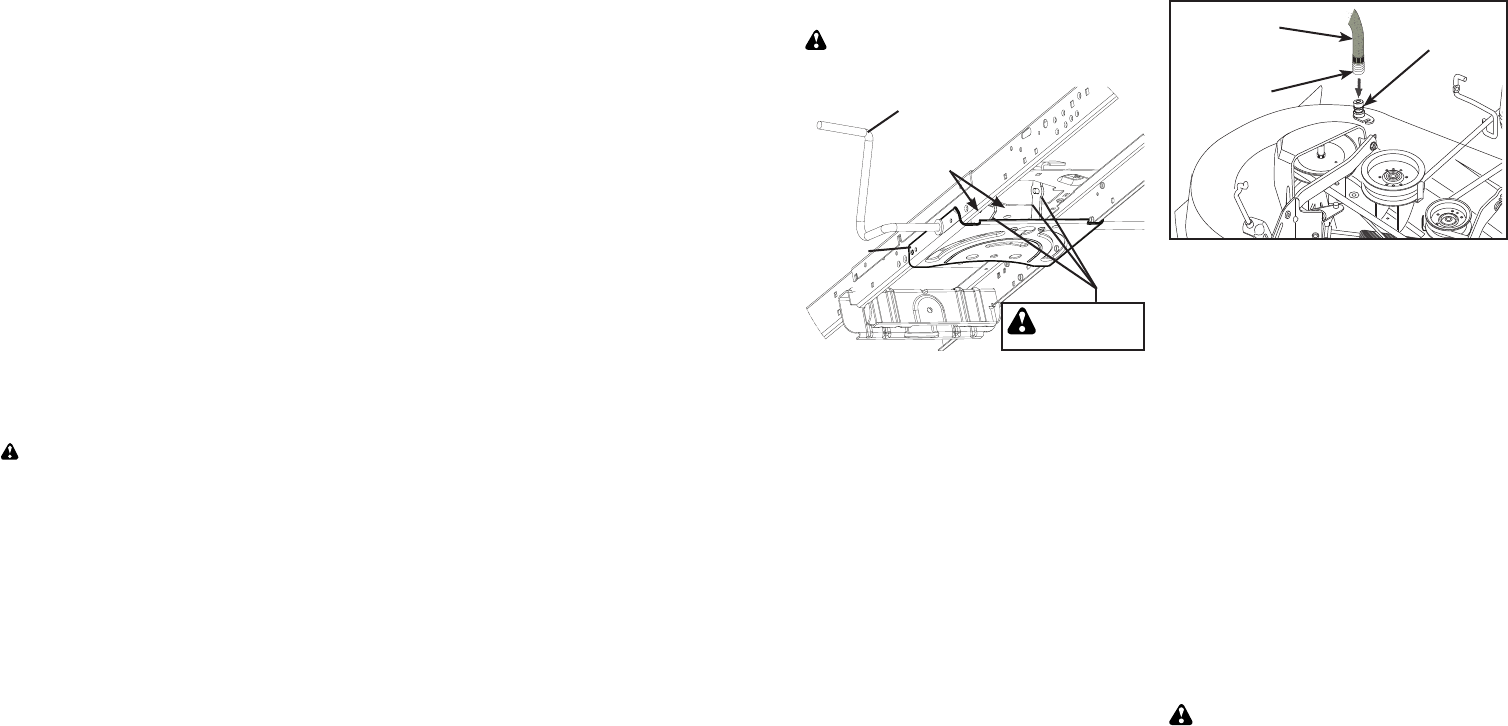
PUERTO DE LAVADO DE LA CUBIERTA
La cubierta de su tractor está equipada con un
puerto de lavado sobre la superficie que forma
parte del sistema de lavado de la cubierta. Se de-
bería utilizar cada vez que se haya usado el tractor.
1. Lleve el tractor a un lugar horizontal y despe-
jado de su césped, lo bastante cerca de
una boca de riego como para que llegue la
manguera del jardín.
IMPORTANTE: Asegúrese de que la boca de
descarga del tractor está orientada LEJOS de
su casa, garaje, coches aparcados, etc. Quite
la boca de ensacado o cubierta de mantillo si
está acoplada.
2. Mueva el control del embrague del accesorio
a la posición “DESENGANCHADO”, ponga el
freno de estacionamiento y apague el motor.
3. Enrosque el adaptador de la boquilla (empa-
quetado con el manual del operador del trac-
tor) en el extremo de la manguera del jardín.
IMPORTANTE: Tire de la manguera para asegu-
rarse de que la conexión está bien fija.
5. Abra la llave del agua.
6. Desde la posición del operador del tractor,
vuelva a arrancar el motor y ponga la palanca
de aceleración en la posición “Fast” (rápido).
IMPORTANTE: Vuelva a comprobar la zona para
asegurarse de que está despejada.
7. Mueva el control del embrague del accesorio a
la posición “ENGANCHAR”. Manténgase en la
posición del operador con la cubierta de corte
acoplada hasta que la cubierta esté limpia.
8. Mueva el control del embrague del accesorio a
la posición “DESENGANCHADO”. Gire la llave
de encendido a la posición STOP para apagar
el motor del tractor. Cierre la llave del agua.
9. Tire hacia atrás la abrazadera de cierre del
adaptador de la boquilla para desconectar el
adaptador del puerto de lavado de la cubierta.
10. Lleve el tractor a una zona seca, preferente-
mente de cemento o pavimentada. Mueva
el control del embrague del accesorio a la
posición “ENGANCHAR” para quitar el ex-
ceso de agua y ayudar a que se seque antes
de guardar el tractor.
ADVERTENCIA: Si el accesorio de lavado
está roto o no está, Ud. y otras personas
estarán expuestos a que la hoja les lance
aquellos objetos con los que entre en contacto.
• Sustituya inmediatamente el accesorio de
lavado roto o que falta antes de volver a
usar la segadora.
• Tape todos los orificios de la segadora con
pernos y tuercas de seguridad.
Puerto de
Lavado
Adaptador
de Boquilla
Manguera
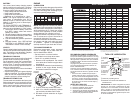
• Mantenga las superficies pulidas y las ruedas
sin de rra mes de gasolina, aceite, etc.
• Proteja las superficies pintadas con cera tipo
automotriz.
No recomendamos que se utilice una manguera
de jardín o agua a presión para limpiar el
tractor a no ser que el motor y la transmisión
estén cubiertos para protegerlos del agua.
El agua en el motor y la transmisión acortan la
vida útil del tractor. Utilizar aire comprimido o un
soplador de hojas para remover hierba, hojas y
basura del tractor y cortacéspedes.
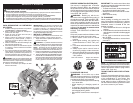
LIMPIEZA
• Limpie todo material extraño del motor, la
batería, el asiento, el pulido, etc.
• Limpie los desechos de la placa guía. Los
desechos pueden limitar el movimiento del eje
del pedal del freno/embrague, lo que hará que
patine la correa y que se pierda la tracción.
PRECAUCIÓN: Evite todos los puntos de
enganche y las piezas móviles.
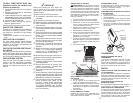
SISTEMA DE DIRECCIÓN, SALPICADERO,
GUARDABARROS Y SEGADORA NO MOSTRADOS
Pedal Del Embrague/
Freno
Placa
De
Dirección
Limpiar Parte
Superior
PRECAUCIÓN:
PUNTOS DE
ENGANCHE
4. Eche hacia atrás la abrazadera de cierre del
adaptador de la boquilla y empuje éste en el
puerto de lavado de la cubierta en el extremo
izquierdo de la cubierta de la segadora. Suelte
la abrazadera de cierre para fijar el adaptador
en la boquilla.