


...
MAINTENANCE
INSTRUCTIONS
BLADE CARE
For best results mower blades must
be
kept sharp. The blades
can
be
sharpened
with
a few strokes
of
a file
or
on
a grinding
wheel. Do
not
attempt
to
sharpen while on mower.
PLACE
THE
MOWER CLUTCH CONTROL
LEVER IN
THE
"OUT"
POSITION, LOCK
THE
PARKING
BRAKE
,
SHIFT
INTO
NEUTRAL
AND
SHUT-
OFF
THE
EN
·
GINE.
MAKE
ABSOLUTELY
SURE
THE
BLADES
AND
ALL
MOVING
PARTS
HA
VE COMPLETELY STOPPED. REMOVE
THE
IGNITION
KEY,
DISCONNECT THE
SPARK PLUG WIRE(S) FROM THE SPARK
PLUG(S)
AND
KEEP WIRE{S)
AWAY
FROM THE PLUG
(S)
TO PRE
VENT
IN
-
JURY
FROM
ACCIDENTAL
START
ING.
When
grinding,
care
should
be
taken
to
maintain blade balance
and the blade should
be
checked
for
proper balance before re·
installation on mower. Unbalanced
or
bent blade
will
cause
ex·
cessive
vibration when running, and eventual
damage
to
mower
or
engine. Replace bent
or
damaged blade
s.
To
insure satisfactory operation,
it
is
recommended
that
be·
fore the start
of
each
mowing
season,
the.
old blades
be
dis·
carded and
re
placed
with
new b
lades
. Mower blades
can
be
purchased at all
Sears
retail stores and mail order outlets.
BLADE
REPLACEMENT
It
is
not
necessary
to
remove mower
from
tractor for blade re·
placement. Raising mower
lift
lever
to
highest position
will
per·
mit
access
to
blades.
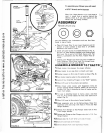
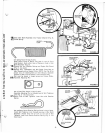
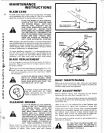
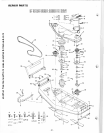
1.
Remove the
two
Hex
Head
Bolts
and
Lockwashers (Fig. 16)
..
2.
1nstall new blade
with
SHARP EDGE DOWN and secure
with
two
Lockwashers and
two
Hex
Head
Bolts.
TIGHT·
EN
SECURELY.
ALWAYS
U
SE
GRADE
5
HEAT
TREATED
BOLTS
TO
ATTAC
H BLADES. CHECK
BOLTS IN BLADES
OCCASIONALLY
TO
MA
KE
SURE BOLTS ARE
TIGHT.
TOR·
QUE BOLTS
45
• 50 FT.
LBS
.
A GRADE 5 H
EAT
TREATED
BOLT
CAN
BE
IDENTIFIED
BY
THREE
LINES
INDICATED
ON
THE
BOLT
HEAD AS SHOWN
AT
LEFT.
CLEANING MOWER
PLACE
TH
E MOWER CLUTCH CONTROL
LEVER
IN
THE
"O
UT"
POS
ITION
, LOCK
THE
PARKING
BR
AK
E,
SHIFT
INTO
NEUTRAL
AND
SHUT-OFF
THE
EN
·
GINE.
MAKE
ABSOLUTELY
SURE THE
BLADES
AND
ALL
MOVING
PARTS
HAVE
COMPLETELY STOPPED. REMOVE
THE IGNITION
KEY,
DISCONNECT THE
SPARK PLUG W
IR
E(S) FROM
THE
SPARK
PLUG(S)
AND
KEEP WIRE(S)
AWAY
FROM THE PLUG(S)
TO
PREVENT IN-
JURY
FROM ACC
ID
ENTAL
START
ING.
Mower should
be
removed from tractor
for
cleaning. Water
pressure from a gard
en
hose
will
remove fresh clippings
from
underside
of
mower.
Clean
mower after each mowing.
-7-
BLADE
FIGURE
16
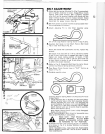
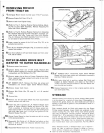
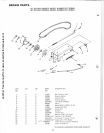
FIGURE 17
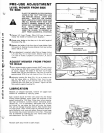
DAILY
MAINTENANCE
Make sure all nuts on bolts
are
tight, cotter pins and retainer
springs
are
secure. Keep blades sharp. Observe all safety pre·
cautions. Keep mower well lubricated.
BELT
ADJUSTMENT
Remove Retainer Spring from Adjusting
Pin
and remove
Adju
sting Pin from Idler Shaft Assembly (Fig. 17).
(Refer
to
Fig. 18). Remove Retainer Spring from Adjusting
Pi
n
on
Snubber Pull Rod
in
Idler Shaft Assembly. Remove Adjust·
ing
Pin
from hole.
(Refer
to
Fig. 17). Turn Adjusting
Pin
on Belt Tightener
Link
counterclockwise
to
tighten belt, clockwise
to
loosen belt.
Engage
clutch lever (push forward). Belt
is
properly adjusted
when belt
can
be
squeezed
together
with
thumb
and fore
fin
-
ger
(without
undue pressure) midway between engine and
idler pulleys.
After
2 hours
use
recheck belt
for
proper ten-
sion. Replace retainer spring in Adjusting
Pin
(Fig.
17).
Belt from center
to
outside mandrels
is
spring loaded and no
adjustment
is
necessary.
AT
THIS
TIME
YOU MUST
ADJUST
TH
E
SNUBBER
PULL
ROD. FOLLOW
THE
IN··
FORMATION
UNDER
"A
DJUSTMENT
OF
SNUBBER"
ON PAGE 8.
another free manual from www.searstractormanuals.com