


flamesfromwaterheaters,electric
motorsorswitches,furnaces,etc.
• Storeattachmentsobladecannotac-
cidentallycauseinjury.
• Storeattachmentindoors,outofreach
ofchildren.
Ifsituationsoccurwhicharenotcov-
eredinthismanual,usecareand
goodjudgment.Ifyouneedassis-
tance,contactyourSearsService
Centre.
SPECIALNOTICE:Exposuretovibra-
tionsthroughprolongeduseofgasoline
poweredhandtoolscouldcauseblood
vesselornervedamageinthefingers,
hands,andjointsofpeoplepronetocir-
culationdisordersorabnormalswell-
ings.Prolongeduseincoldweatherhas
beenlinkedtobloodvesseldamagein
otherwisehealthypeople.Ifsymptoms
occursuchasnumbness,pain,lossof
strength,changeinskincolorortexture,
orlossoffeelinginthefingers,hands,
orjoints,discontinuetheuseofthistool
andseekmedicalattention.Ananti-
vibrationsystemdoesnotguaranteethe
avoidanceoftheseproblems.Users
whooperatepowertoolsonacontinual
andregularbasismustmonitorclosely
theirphysicalconditionandthecondi-
tionofthisunit.
SAVE THESE INSTRUCTIONS
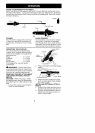
CARTON CONTENTS
Check carton contents against the fol-
lowing list.
Model 0944.514610
• Pruner attachment
• Shoulder strap
• Upper shoulder strap clamp
• Lower shoulder strap clamp (with
spacer tabs)
• Shoulder strap clamp screws (2)
• Attachment hanger
• Bar sheath
• Chain adjustment tool (bar tool)
• Hex wrench
• Bar and chain oil
Examine parts for damage. Do not
use damaged parts.
NOTE: If you need assistance, or find
parts missing or damaged, contact
your Sears Service Centre.
ASSEMBLY
_WARNING: If received as-
sembled, repeat all steps to ensure
your unit is properly assembled and all
fasteners are secure.
TOOLS REQUIRED
• Hex wrench (provided)
INSTALLING PRUNER ATTACH-
MENT
CAUTION: When removing or instal-
ling attachments, place the unit on a
flat surface for stability.
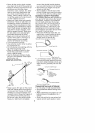
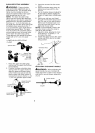
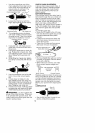
1. Loosen the coupler by turning the
knob counterclockwise.
Coupler
LOOSEN
TIGHTEN Knob
2. Remove the shaft cap from the
pruner attachment (if present).
3. Position locking/release button of
attachment into guide recess of
coupler.
4. Push the attachment into the cou-
pler until the locking/release button
snaps into the primary hole.
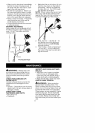
5. Before using the unit, tighten the
knob securely by turning clock-
wise.
Coupler Primary Hole
\ // Guide Recess
PP Release Lower
Shaft Attachment
Button
_WARNING: Make sure the lock-
ing/release button is locked in the pri-
mary hole and the knob is securely
tightened before operating the unit.