


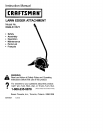
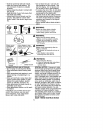
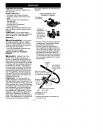

CARTON CONTENTS
Check carton contents against the fol*
lowing list.
Model C944.511571
Edger Attachment
Handlebar (with clamp and knob)
Clamp Base (with spacer tabs)
Clamp screws (4)
Attachment hanger
Rex wrench
Examine parts for damage. Do not
use damaged parts.
NOTE: If you need assistance or find
parts missing or damaged, call
1-800-235-5878.
ASSEMBLY
_ WARNING: If received as-
sembled, repeat all steps to ensure
your unit is properly assembled and all
fasteners are secure.
* A hex wrench (provided) is required
for assembly.
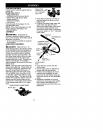
HANDLEBAR ASSEMBLY
_l_ DANGER: RISK OF CUT. To
avoid serious in ury, the barrier portion
of the hand ebar must be nsta ed as
shown on the upper tube of the pow-
erhead to provide a barrier between
operator and the spinning blade. At-
tach tube clamp above arrow on safe-
dtywarning decal on the upper tube
powerhead end of unit). Ensure han-
lebar is positioned on handlebar
clamp between the arrows on the han-
dlebar decal.
NOTE: The tube clamp base has four
spacer tabs attached. These tabs are
provided to adapt this attachment for
use with powerheads that have a 1"
diameter upper tube (the tube clamp
will not tighten down securely on the
1" diameter upper tube without using
these spacer tabs). The tabs must be
broken off completely before use and
placed over the screw holes on the
clamp base. These tabs are not need-
ed for powerheads with a 7/8" upper
tube.
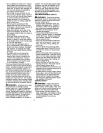
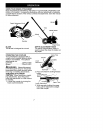
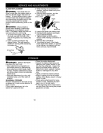
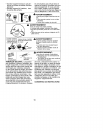
HANDLEBAR CLAMP BASE
Spacer T._ =4_lb.,_
Spacer Tabs _ _,P
posi!ionedforuse-
upper tube _I
1. Place the tube clamp over the up-
per tube above the arrow on the
safety decal.
2. Position the clamp base under the
upper tube and align the tube
clamp and clamp base screw holes
(use spacer tabs between tube
clamp and clamp base if necessary
to secure clamp, i.e. for 1" diameter
upper tube).
Handlebar
POWERHEAD
END
Handlebar Clamp
between arrows on
handlebar decal
Knob
SCOWS
Arrow on
Safety Decal
ATTACHMENT
END
3. Insert the four screws into the
screw holes.
4. Secure tube clamp by tightening
screws with the hex wrench.
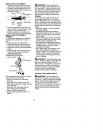
5. Position the handlebar as shown,
ensuring the handlebar is posi-
tioned on the handlebar clamp be-
tween the arrows on the handlebar
decal.
6. Retighten handlebar by turning
clamp knob clockwise until handle-
bar is secure and stationary in
clamp (clamp knob cannot be over-
tightened).
6