


Any power equipment can cause injury ifoperated improperly
or if the user does not understand how to operate the
equipment. Exercise caution at al! times, when using power
equipment.
Refer to your tractor owners manual for "Rules For
Safe Operation",
Look for this symbol to point out important safety
precautions. It means--Attention!! Become
alert!! Your safety is involved.
TOOLS REQUIRED
(1) 9/16" Wrench
(1) 1/2" Wrench (for heat shields)
CAUTION! Muffler is hot! Allow engine to
cool down before proceeding with bumper
installation.
\
\
X-
E
Y
H
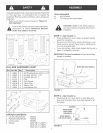
FULL SmZE HARDWARE CHART
Ref,
A
B
c
D
E
F
G
H
Part No,
48894
43062
43001
44742
48866
1643-60
43070
43003
Qty.
2
2
2
4
2
2
4
4
Description
SelfThreading Screw, 3/8o16x 1-1/2'
Hex Bolt, 3/8-16 x 1-1/2"
Hex Bolt, 3/8-16 x 1"
Plug
Pivot Spacer
Plastic Grip
Washer, 3/8"
Lock Washer, 3/8"
CARTON CONTENTS
1. Left Mounting Bracket
2. Right Mounting Bracket
3. Locking Lever
4. Bumper
#25037
#25038
#64862
#64614B (71-246211 )
#64614S (71-24622)
#64614C (71°24623)
STEP 1: (SEE FIGURE 1)
. Place cardboard on work surface to protect painted
parts from scratches.
. Remove hood from tractor using instructions in your
tractor owner's manual. Place hood on cardboard or
on a mat to protect paint.
. if your tractor has a heat shield shaped like the one in
figure 1, temporarily remove it.
iMPORTANT: Be sure to reattach the heat shield after
bumper is installed.
MUFFLER HEAT SHIELD
J //
FIGURE 1
STEP 2: (SEE HGURE 2)
, Place plug (D) on a work bench or solid table and
push end of bumper down onto plug. Repeat for a!l
four plugs.
BUMPER
PUSH DOWN
W{TH EVEN
PRESSURE
WORK BENCH
OR SOUD TABLE__PLUG
FIGURE 2