


4
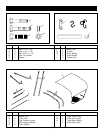
TOOLS REQUIRED FOR ASSEMBLY
(2) 7/16” Wrenches or Socket Wrench
(2) 1/2” Wrenches or Socket Wrench
REMOVAL OF PARTS FROM CARTON
Remove all parts and hardware package from the
carton. Identify all parts and hardware by referring to
the Carton Contents on previous page.
ASSEMBLING SUN SHADE
NOTE: Your tractor fender style may differ from the
one shown in the drawings. The following
instructions apply to all fender styles.
• Raise tractor seat to access seat mounting hard-
ware.
• Remove original bolt and nut from left side of seat
mount bracket.
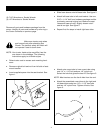
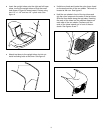
• Insert supplied spacer into the seat bracket. See
figure 1.
FIGURE 1
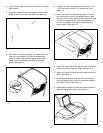
• Slide foam sleeve onto left base tube. See figure 2.
• Attach left base tube to left seat bracket. Use one
5/16” x 1-1/4” bolt from hardware package and the
previously removed original nut. Make sure seat
raises and lowers freely. Slightly loosen nuts if
seat is too tight. See figure 2.
• Repeat first five steps to install right base tube.
FIGURE 2
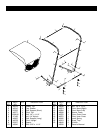
• Attach outer cross tube to inner cross tube using
one 1/4” x 1-1/4” bolt and one 1/4” nylock nut.
Select the hole that gives the best fit. See figure 3.
NOTE: Most tractors use the fourth hole from the end.
• Attach the assembled cross tubes to the right and
left base tubes using two 1/4” x 1-1/2” hex bolts
and two 1/4” nylock nuts. Tighten all bolts. See
figure 3.
FIGURE 3
TRACTOR SEAT
BRACKET
SPACER
ASSEMBLY
CAUTION: Make sure tractor seat raises
and lowers freely after attaching Sun
Shade. The tractor's safety kill switch will
not operate if seat is stuck down.
1/4" X 1-1/2"
HEX BOLT
INNER
CROSS TUBE
1/4" X 1-1/4"
HEX BOLT
OUTER CROSS TUBE
NYLOCK
NUT