


5
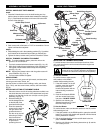
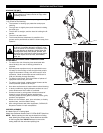
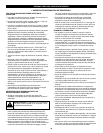
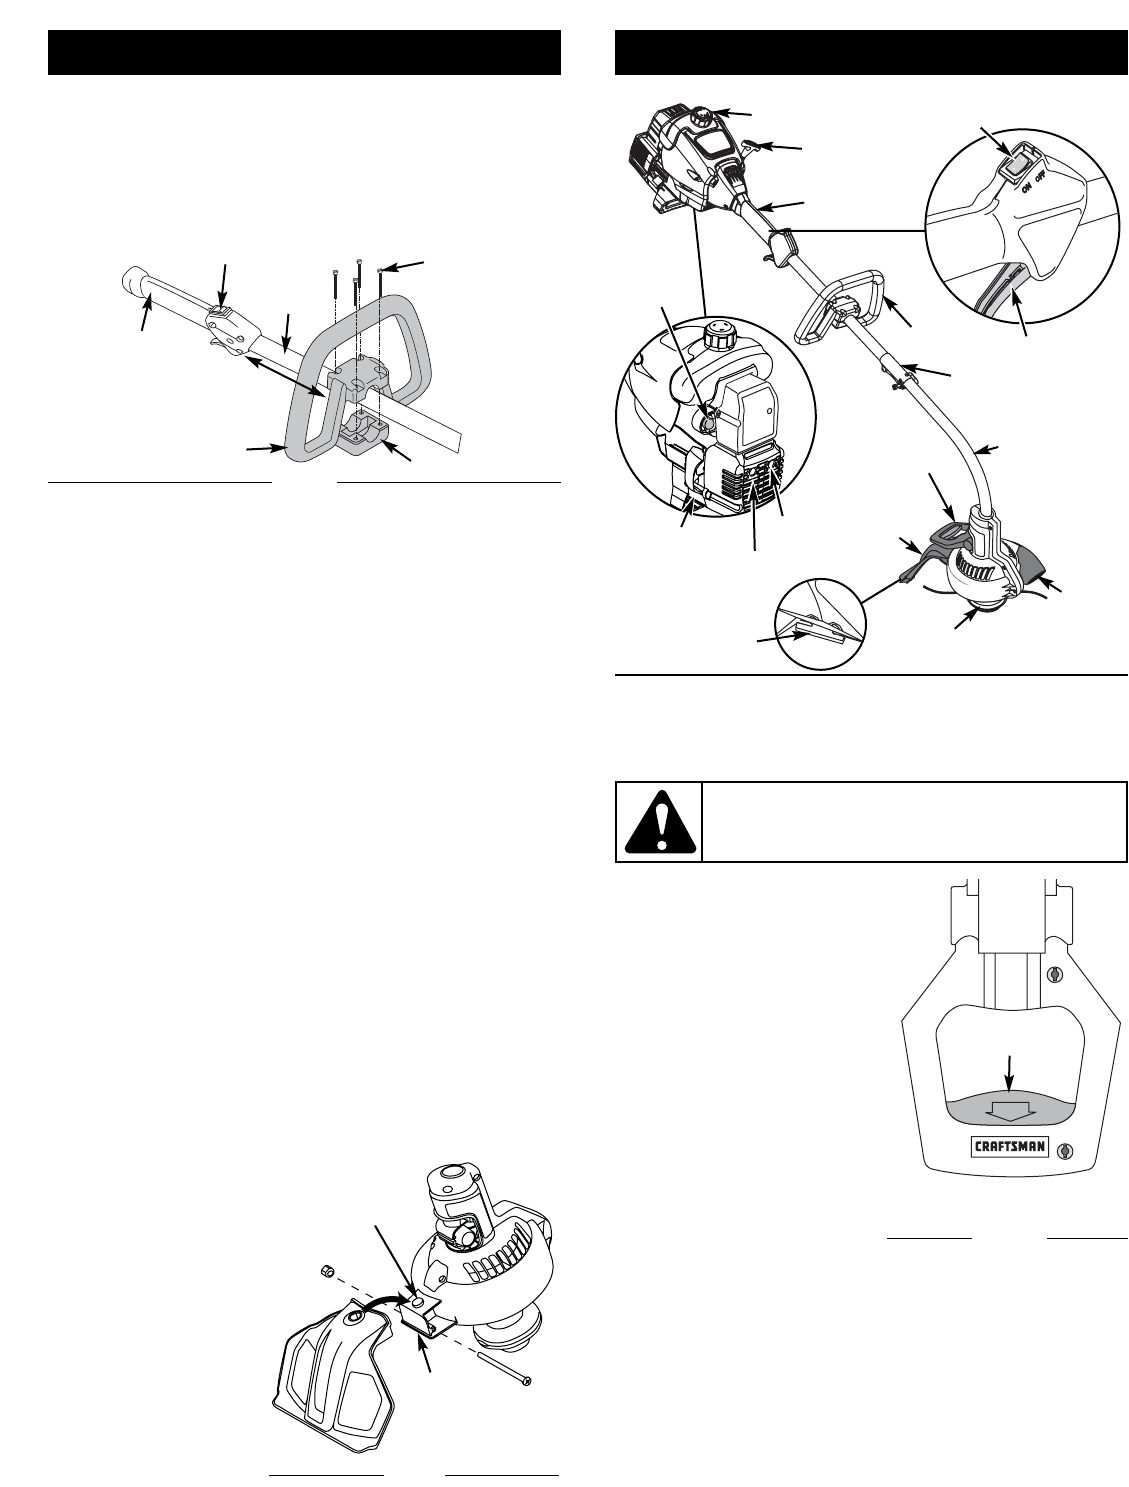
INSTALL AND ADJUST THE D-HANDLE
Install
1. Place the D-handle down on to the shaft housing and the
bottom clamp so that the handle slants towards the shaft grip
(Fig. 1). Place handle and clamp a minimum of 6 inches from
the end of the shaft grip.
2. Start screws with a flat-head or T-25 Torx screwdriver. Do not
tighten until handle is adjusted.
Adjust
3. While holding the unit in the operating position (Fig. 2), position
the D-handle to the location that provides you the best grip.
4. Tighten the clamp screws evenly until the D-handle is secure.
INSTALL TRIMMER / BLOWER ATTACHMENT
NOTE: To make installation easier, place the unit on the
ground or on a workbench.
1. Turn knob counterclockwise to loosen coupler (Fig. 14, p. 8).
2. While firmly holding trimmer attachment, push it straight into
the coupler until the release button snaps into the primary
hole (Fig. 15, p. 8).
NOTE: Aligning the release button with the guide recess will
help installation (Fig. 15, p. 8).
3. Turn the knob clockwise to tighten.
APPLICATIONS
Use the trimmer to cut grass and light weeds, and decorative
trimming around trees, fences, etc.
Use the blower to clean around buildings, walls, and fences
(Figs. 7 & 8), and also around trees, shrubs, and flower beds
(Fig. 9).
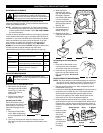
INSTALLING CUTTING ATTACHMENT SHIELD
1. Place the narrow end of the cutting attachment shield over
the shield bracket at the back of the attachment body and
position it so that the circular cut-out slips over the guard
assembly peg (Fig. 2).
2. Place the locking nut
into the hexagonal hole
on the left side of the
guard and hold in place.
3. Insert the assembly
screw into the hole on
the right side of the
guard and screw it
into the nut on the left
side using a Phillips-
head screwdriver.
4. Make sure the screw
is tight before
operating the unit.
Fig. 1
(4) Screws
Shaft Grip
Shaft
Housing
On/Off Stop Control
Minimum 6 Inches
(15.24 cm)
D-Handle
Bottom Clamp
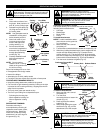
Cutting
Attachment
Shield
Fuel Cap
D-Handle
Hassle Free IV
®
Shaft Grip
Shaft Housing
Starter Rope
Grip
Throttle Control
Primer
Bulb
Air Filter/Muffler
Cover
Spark Plug
Line Cutting
Blade
Convertible™
Coupler
Blower
On/Off Stop Control
KNOW YOUR TRIMMERASSEMBLY INSTRUCTIONS
Shift
Handle
Muffler
SELECTING THE TRIMMER OR BLOWER
To switch between the trimmer and blower functions of this
unit, make sure that the unit is turned off and the engine has
stopped running.
To Use the Trimmer
To use the trimmer, make sure the
shift handle is in the DOWN
position before starting the unit.
1. If the shift handle is in the UP
position, grasp the red shift
latch (Fig. 3) on the shift
handle and squeeze until the
internal locking mechanism
releases.
2. Push the shift handle DOWN
until the red shift latch locks
into place. DO NOT FORCE.
3. Start the unit following the
Starting Instructions (p. 6) and
the unit is ready for use.
To Use the Blower
To use the blower, make sure the shift handle is in the UP position
before starting the unit.
1. If the shift handle is in the DOWN position, grasp the red shift
latch (Fig. 3) on the shift handle and squeeze until the internal
locking mechanism releases.
2. Pull the shift handle UP until the red shift latch locks into
place. DO NOT FORCE.
3. Start the unit following the Starting Instructions (p. 6) and the
unit is ready for use.
WARNING:
To avoid serious personal injury or
damage to the unit, DO NOT attempt to shift between
the trimmer and the blower while the unit is operating.
®
Fig. 3
Shift Latch
Shift Handle
Fig. 2
Guard
Assembly
Peg
Shield
Bracket