


7
ASSEMBLY
NOTE: Operation of this snow thrower on gravel is not recommended as
loose gravel can be easily picked up and thrown by the auger causing
personal injury or damage to the snow thrower. If you have to operate it
on gravel, keep skid shoe in highest position for maximum clearance.
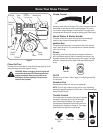
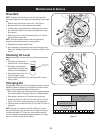
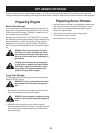
1. Adjust skid shoes by loosening two nuts and carriage bolts on each
skid shoe, and moving skid shoe to the desired position. See Figure 5.
2. Make certain the entire bottom surface of skid shoe is against the
ground to avoid uneven wear on the skid shoes.
3. Tighten nuts and bolts securely.
Clean-Out Tool
This tool has been fastened with a cable tie to the rear of the auger housing
for shipping purposes. Cut and remove cable tie as instructed on page 3.
Final Adjustments
IMPORTANT: Check the adjustments as instructed and make any
final adjustments necessary before operating the unit. Check all nuts
and bolts for tightness. Failure to follow these instructions may cause
damage to unit.
Tire Pressure
The proper inflation pressure is 20 psi. Check the tire pressure periodi-
cally and maintain equal pressure in both tires at all times. Excessive
pressure (well above 20 psi) may cause the wheel (tire/rim) assembly
to burst with sufficient force to cause serious injury. Do not over-inflate
the tire. Use a manual pump or portable electric tire inflator to prevent
over-inflation. NEVER USE AN AIR COMPRESSOR.
WARNING: Over-inflating the tire with excessive pres-
sure (well above 20 psi) may cause the tire/rim to burst
with sufficient force to cause serious pressure.
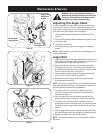
Auger Control Test
IMPORTANT: Perform the following test before operating the snow
thrower for the first time and at the start of each winter season.
Check the adjustment of the auger control as follows:
1. When auger control is released and in the disengaged “up” posi-
tion, cable should have very little slack, but should NOT be tight.
WARNING: Do not over-tighten the cable. Over-
tightening may prevent the auger from disengaging
and compromise the safety of the snow thrower.
2. In a well-ventilated area, start the snow thrower engine as in-
structed on page 10 under the heading Starting Engine. Make sure
the throttle is set in the FAST position.
3. While standing in operator’s position (behind unit) engage auger.
4. Allow auger to remain engaged for approximately ten (10) seconds
before releasing the auger control. Repeat this several times.
5. With the engine running in the FAST
position and the auger
control in the disengaged “up” position, walk to the front of the
machine.
6. Confirm that the auger has completely stopped rotating and shows
NO signs of motion.
IMPORTANT: If the auger shows ANY signs of rotating, immediately return
to the operator’s position and shut off the engine. Wait for all moving parts
to stop before readjusting the auger control cable as shown on page 13.
Figure 4
Figure 5
High Position
Middle Position
Low Position
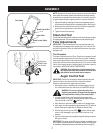
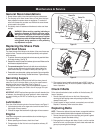
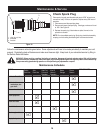
Drive Cable
Auger Cable
Cable Ties
Speed Control Cable
Speed Control Box