


15
ASSEMBLY cont.
14
ASSEMBLY
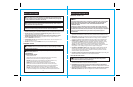
WARNING:
Your hedge trimmer should NEVER be connected to the
power source when you are assembling parts, making adjustments, oiling
blades, cleaning or when it is not in use. Disconnecting the trimmer will
prevent accidental starting, which could cause serious personal injury.
!
WARNING:
To avoid injury, ALWAYS turn off and disconnect the trimmer
from the power outlet BEFORE installing parts, cleaning the trimmer or making
any adjustments.
!
!
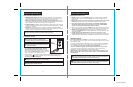
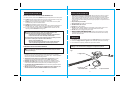
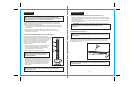
The Blade Safety Guard must be attached before use.
1. Disconnect trimmer from the power supply.
2. Slide the blade guard up the blades with the
large part of it on the topmost part of trimmer
(see Fig. 3).
3. Align holes in blade guard with holes on trimmer unit.
4. Use the two screws included to affix the guard securely.
CAUTION:
ALWAYS make sure you support the weight of the hedge
trimmer by setting it down on a flat, dry surface before you assemble parts,
adjust handles or perform maintenance on the hedge trimmer.
Fig. 3
Fig. 3a
Screw
Screw
ATTACHING THE BLADE SAFETY GUARD (Fig. 3, 3a and 3b)
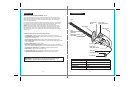
PIGTAIL POWER CORD (Fig. 4)
Your hedge trimmer has a 12-inch pigtail power cord. This cord must be attached to a
proper extension cord (see page 7, EXTENSION CORDS), using the Cord Retainer Clip.
1. Make a loop of extension cord and place through
the elongated hole on the cord retainer clip (Fig. 4).
2. Fasten this loop of extension cord onto the hook on the
cord retainer clip (Fig. 4). Pull excess cord back through
elongated hole.
3. Plug trimmer’s power cord into extension cord plug
(see Fig. 4). Extension cord is now firmly attached to cord
retainer clip.
Fig. 4
OPERATION
Before attempting to use any tool, be sure to familiarize yourself with all the operating
features and safety instructions.
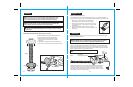
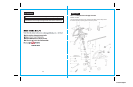
TRIGGER SAFETY POWER SWITCHES (Fig. 5)
There are 2 safety trigger power switches on the handles of your trimmer. Both trigger
switches need to be depressed for the trimmer to operate. Depress and hold the front
trigger switch and depress the rear trigger switch. To stop hedge trimmer, release either
one of the trigger switches and the trimmer will stop.
WARNING:
IF ANY PARTS ARE MISSING, DO NOT OPERATE YOUR
HEDGE TRIMMER UNTIL THE MISSING PARTS ARE REPLACED. FAILURE TO
FOLLOW THIS RULE COULD RESULT IN SERIOUS PERSONAL INJURY.
!
!
Note that the trigger safety power switch on the front auxiliary handle can be
activated on the top of the “T” shaped auxiliary handle. The trigger safety
power switch on the rear handle is under the entire length of the top of the
rear handle. Both switches are designed for convenience, ease of operation
and handling comfort in all cutting positions.
CAUTION:
Remember blades coast after turn off.
Fig. 5
Front Auxiliary
Safety Trigger Power Switch
Rear
Safety Trigger
Power Switch