


Keep the trimmer tilted toward the area being cut; this is
the best cutting area.
The string trimmer cuts when passing the unit from left
to right. This will avoid throwing debris at the operator.
Avoid cutting in the dangerous area shown in figure 8.
Use the tip of the string to do the cutting; do not force
string head into uncut grass.
Wire and picket fences cause extra string wear, even
breakage. Stone and brick walls, curbs, and wood may
wear strings rapidly.
Avoid trees and shrubs. Tree bark, wood moldings,
siding, and fence posts can easily be damaged by the
strings.
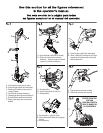
The boom can be extended or shortened for ease of use.
Unplug the string trimmer.
Unscrew telescoping boom coupler and slide to desired
position.
Tighten telescoping boom coupler.
Unplug the string trimmer.
Pull up edging coupler and turn handle end
counterclockwise.
Release edging boom coupler when handle has been
rotated 180°.
The rotating handle can be used in combination with the
edger guide for edging sidewalks and walkways. To use
the edger guide, flip down from it’s stored position.
CUTTING TIPS
THE CUTTING LINE
TELESCOPING BOOM
ROTATING REAR HANDLE
EDGING
See Figure 8, page ii.
See Figure 7, page ii.
See Figure 9, page ii.
See Figure 11-13, page ii.
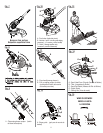
THREE-POSITION PIVOTING HEAD
Unplug the string trimmer.
Depress the pivot button and move the trimmer head
up or down to one of the three positions indicated by
the notches.
See Figure 10, page ii.
DO NOT grasp the exposed cutting line
when picking up or holding the trimmer.
A single 0.065-inch round cutting line is pre-installed on the
trimmer. When the cutting line needs replacing, install a
new pre-wound spool. Craftsman 71-85967.
During operation, cutting lines shorten due to normal wear.
For greater convenience and efficiency, your trimmer has
been equipped with a bump feed head that allows you to
simply bump the trimmer head to extend the cutting lines
while the trimmer is operating. Cutting line will wear faster
and require more feeding if the cutting or edging is done
along sidewalks or other abrasive surfaces or heavier
weeds are being cut.
While the trimmer is on and spinning, gently bump the
spool housing on a firm surface (hard ground or
sidewalk). This should release additional cutting line
from the spool.
If no line is released, bump the trimmer head more
sharply or try bumping it on a firmer surface.
If there is no change in the cutting line length, un-plug
the trimmer’s pigtail power cord from the extension
cord. After the trimmer head stops rotating, gently pull at
the cutting lines manually. Once the lines are pulled out
(extended), plug the trimmer’s pigtail power cord into the
extension cord and resume cutting.
If the cutting line still does not feed from the spool, the
spool might be empty or the cutting line may be tangled
or jammed on the spool. Un-plug the trimmer’s pigtail
power cord from the extension cord. After the trimmer
head stops rotating,remove the spool (see steps1
through 3 in “Removing the Spool” on page 9).
If the line is tangled or jammed, untangle and replace
the line. If the spool is empty, replace the spool.
EXTENDING THE CUTTING LINE
To avoid injury, ALWAYS turn off and
disconnect the trimmer from the power outlet BEFORE
installing parts or cleaning the trimmer or making any
adjustments.