


AVAILABLE CUTTING ATTACHMENTS
Brushcutter attachment ..................................................358.79244
Edger attachment ..............................................................358.79240
Cultivator attachment ......................................................358.79241
Blower attachment ............................................................358.79242
Pruner attachment .............................................................358.79245
INSTALLING CUTTING ATTACHMENTS
Your unit is provided with the Hassle-Free TM Cutting
Head attachment shaft.
NOTE:Place the unit on the ground or on awork bench
to make accessory installation or removal easier.
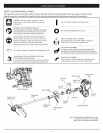
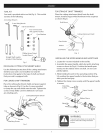
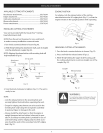
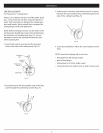
1.Turn knob counterclockwise to loosen (Fig.10).
2.While firmly holding the attachment shaft, push it straight
into the attachment coupler (Fig.10).
NOTE:Aligning the release button with receiving hole will
help installation (Fig.10).
Line up )arts
Attachment
Coupler
Receiving Hole
Knob
Upper Shaft
Housing
Release Button
f
Attachment
Shaft
Fig. 10
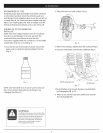
3.Turn the knob clockwise to tighten (Fig. 11). The unit is
ready to use.
NOTE:
• Lock the release button in the receiving hole and
securely tighten the knob before operating this unit.
• Except for edging, attachments are to be used in the
receiving hole only. Using the wrong hole could lead
to personal injury or damage to the unit.
• Always install the attachment so that the engine is
upright (propane tank on bottom) when unit is oper-
ated. A secondary receiving hole is provided for use of
a trimmer being used for edging only. No other acces-
sory should be used in this secondary hole (90° edging
hole) ( Fig.11).
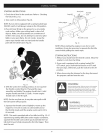
EDGING POSITION
For edging, lock the release button of the cutting
attachment into the 90° edging hole (Fig.11), so that the
engine remains in the upright position while operating.
90° Edging
Hole
Fig. 11
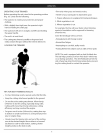
REMOVING CUTTING ATTACHMENTS
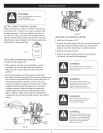
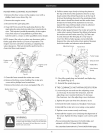
1.Turn the knob counterclockwise to loosen (Fig.12).
2. Press and hold the release button (Fig.12).
3. While firmly holding the upper shaft housing, pull
the cutting attachment or add-on straight out of the
coupler (Fig.12).
Coupler
Release Button
Fig. 12
WARNING:
To avoid serious injury and damage to the unit,
shut off the unit before removing or installing
attachments.