


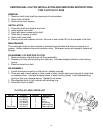

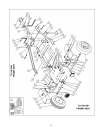


CENTRIFUGAL CLUTCH INSTALLATION AND SERVICING INSTRUCTIONS
FOR CLUTCH 911-0236
REMOVAL
1. Remove clutch from shaft by removing bolt and washers.
2. Slide clutch off shaft.
3. Remove key from keyway.
INSTALLATION
1. Clean the shaft and remove any burrs.
2. Install spacer onto shaft.
3. Apply anti-seize compound to shaft.
4. Place key in keyway in shaft.
5. Slide clutch onto shaft.
6. Secure clutch with washer and bolt. Be sure to use Loctite 243 on the threads of the bolt.
MAINTENANCE
The centrifugal clutch on this machine is permanently lubricated and does not require oil or
grease. Always replace shoes and springs in sets. Whenever shoes are changed, replace all
springs.
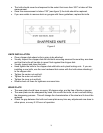
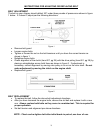
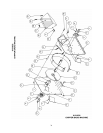
DISASSEMBLY OF EXISTING CLUTCH
1. Remove retainer ring and press off drum assembly.
2. Release one hook end of spring from shoe pin. Use tape wrapped pliers to avoid nicking
spring.
3. Remove shoes from hub.
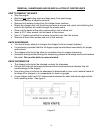
RE-ASSEMBLY
1. Locate the shoes correctly on the hub for rotation required.
2. Place one end of each spring in hole at end of shoe, stretch spring just enough to clear hole
on adjacent shoe. Use tape wrapped pliers to avoid nicking spring. Avoid overstretching
spring as this may damage spring. Repeat for all shoes.
3. Re-assemble drum to hub, secure with retaining ring.
4. Re-install clutch on shaft.
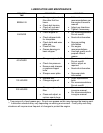
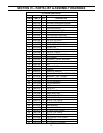
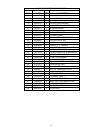
CLUTCH, 911-0236, PARTS LIST
Item No. Part No. Quantity Description
1
2
3
4
6
Not Shown
911-0236-3
911-0236-1
030-0202-5
911-0236-2
030-0164-6
030-0202-1
1
3
3
1
1
2
Hub Assy.
Shoe
Spring
Drum Assy.
Retaining Ring
Retaining Ring
28