


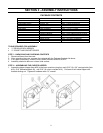
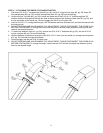


STEP III – ATTACHING THE HITCH ARMS AND TRAILER HITCH ASSEMBLY
1. Attach the hitch arms (item #39, pg. 29) to the trailer frame using the two hitch arm mounting plates (item #52,
pg. 29) and four 1/2”-13 x 1-1/4” HHCS (item #38, pg. 29) from the bolt bag. Do not
tighten hardware at this
time.
2. Attach the trailer hitch assembly (item #45 & #46, pg. 30) to the hitch arms as shown in drawing with two 1/2”-
13 x 3” HHCS (item #47, pg. 30) and two 1/2”-13 gripco lock nuts (item #42, pg. 28) from the bolt bag. Tighten
all hardware at this time.
3. Slide the stand (item #51, pg 30) up through the holes in the hitch assembly and secure with the hair cotter pin
(item #50, pg. 30).
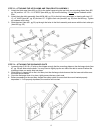
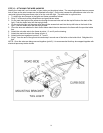
STEP IV – ATTACHING THE DISCHARGE CHUTE
1. Loosen the two 5/16-18 x 4” bolts on the chipper enough that the mounting plates on the discharge chute (item
#7, pg. 29) will slide onto the bolts. You may have to slightly tap the nut side of the bolt to center it before the
discharge chute can easily slide into place.
2. Slide the top L shaped slot on first, and then pivot the discharge chute down so that the lower slot slides over
the lower bolt as shown.
3. Once the discharge chute is in place, tightly secure the two-nylock nuts.
4. Before proceeding to the next step, inspect the safety switch to ensure that the mount bracket properly
depresses it. If not properly depressed, the machine will not start.
12