


CALL TOLL FREE 1-800-DR-OWNER 35
Tine Shear Pins
WHEN PERFORMING ANY MAINTENANCE, YOU MUST FIRST SHUT OFF THE ENGINE, WAIT FIVE (5)
MINUTES TO ALLOW PARTS TO COOL AND DISCONNECT THE SPARK PLUG WIRE, KEEPING IT AWAY
FROM THE SPARK PLUG.
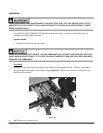
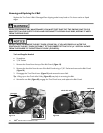
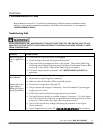
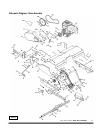
• The DR ROTO-HOG POWER TILLER drive components are protected from damage by Grade 5 Shear
Pins in the Tine Assemblies (Figure 21). The Shear Pins hold the Tine Assemblies in proper location on
the Drive Axles. Should a Tine Assembly strike or pick up a large hidden object and jam, the Shear Pin
holding the Tine Assembly to the drive shaft will shear or break, and the drive components of the DR
ROTO-HOG POWER TILLER will not sustain damage.
• Two (2) extra sets of Tine Shear Pins are included with the DR ROTO-HOG POWER TILLER.
• The design of the Tine Shear Pin is to loosely fit when properly installed.
NEVER ATTEMPT TO USE A BOLT OR PIN THAT IS LARGER OR HARDER THAN THE ORIGINAL GRADE 5
SHEAR PIN.
Tine Operation Check
BEFORE PERFORMING THIS CHECK, YOU MUST FIRST SHUT OFF THE ENGINE, WAIT FIVE (5)
MINUTES TO ALLOW PARTS TO COOL AND DISCONNECT THE SPARK PLUG WIRE, KEEPING IT AWAY
FROM THE SPARK PLUG.
1. Disengage the Tines and raise them up off the ground using the Control Box.
2. Rotate one set of Tines with your hand; the other set should also rotate.
3. Replace the Spark Plug wire.
Figure 21
Shear Pin
Shear Pin