


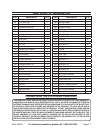
Page 13SKU 94678
For technical questions, please call 1-800-444-3353.
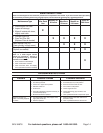
INSPECTION, MAINTENANCE, AND CLEANING
(See maintenance chart on next page.)
WARNING! Make sure the Power Switch of the generator is in its “OFF” posi-
tion, that the engine has cooled, and that all loads are unplugged from the electrical
outlets before performing any inspection, maintenance, or cleaning procedures.
BEFORE EACH USE, inspect the general condition of the generator. Check for
loose screws, misalignment or binding of moving parts, cracked or broken parts,
damaged electrical wiring, and any other condition that may affect its safe operation.
If abnormal noise or vibration occurs, have the problem corrected before further
use. Do not use damaged equipment.
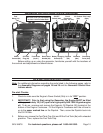
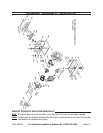
TO CLEAN THE AIR FILTER: While wearing a NIOSH-Approved dust mask/respi-
rator, remove the Air Filter Cover (67) and remove the Foam Filter (69) underneath.
If it is ragged or has holes, it will need to be replaced. Rinse the filter out by hand
with mild soap and water. Allow it to dry thoroughly before replacing it and reas-
sembling the Air Filter Cover (67).
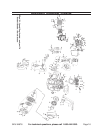
TO REMOVE THE SPARK PLUG:
WARNING! To access the spark plug, the Fuel Tank (8a) must be removed.
Carefully make sure that the engine is thoroughly cool, that no ignition sources
(including lit cigarettes) are nearby, that rags for cleaning up spills and a
class ABC fire extinguisher is nearby, and that you have a suitable place to
temporarily put the gas tank during work.
First, make sure that the Fuel Valves (9a, 81) are both turned to their OFF posi-
tions. Secure the Fuel Valve (9a) under the Fuel Tank closed using a string or
cable tie if possible.
Have a rag ready to promptly clean up the small amount of fuel that will spill and
disconnect the fuel line from the Fuel Valve (9a) under the Fuel Tank (8a). Use
a small cap to cover the end of the fuel valve to prevent debris from entering.
Remove the four Bolts (4a) and other hardware from the corners of the Fuel Tank
(8a). Make sure to note the order of the hardware that secures the Fuel Tank to
the Frame – it is important that the fuel tank is reinstalled in the same fashion.
Gently remove the Fuel Tank and set it aside without tipping it, being careful not
to damage the Fuel Valve under the Tank.
Now you have access to remove the Spark Plug (44) without difficulty. Care-
fully check that the spark plug and wire are both in good condition and securely
attached before reassembly.
Reassembly is the reverse of the earlier steps. Take note that the Fuel Tank
must be reinstalled with the Fuel Gauge in the same orientation as originally
(see illustrations on page 9). The fuel tank should fit in place without contacting
any engine or alternator components.
1.
2.
3.
4.
a.
b.
c.
d.
e.
f.