


COLORband™ PiX User Manual Rev. 6 Page 11 of 21
Configuration
(DMX)
Set the product in DMX mode to control with a DMX controller.
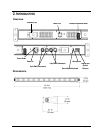
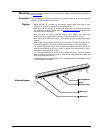
1. Connect the product to a suitable power outlet.
2. Turn the product on.
3. Connect a DMX cable from the DMX output of the DMX controller to the DMX input
socket on the product.
DMX
Personalities
and Starting
Address
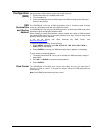
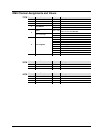
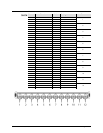
The COLORband™ PiX has 8 DMX personalities, from a 3-
channel mode for basic
control to a 36-channel mode with more advanced control.
The COLORband™ PiX uses up to 36 DMX channels in its 36-
channel DMX mode, which
defines the highest configurable address to 477.
When selecting a starting DMX address, always consider the number of DMX channels
the selected DMX mode uses. If the
starting address is too high, access to some of the
product’s channels will be restricted.
If you are not familiar with DMX, download the “DMX Primer” from
www.chauvetlighting.com.
To select the DMX personality, do the following:
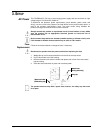
1. Press <MENU> repeatedly until 3-CH, 4-CH, 6-CH, 7-CH, 9-CH, 12CH, 18CH, or
36CH shows on the display.
2. Press <ENTER> to choose your DMX personality when it appears on the display.
To then choose your starting address:
1. The display should show d 1 once you’ve selected your DMX personality using the
steps above.
2. Use <UP> or <DOWN> to select the starting address.
3. Press <ENTER>.
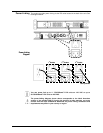
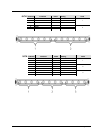
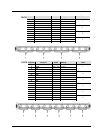
Zone Control
The COLORband™ PiX offers zone control of the lights, and you can select from 2
through 12 zones to control. To access this feature
, choose the DMX personality as
shown above.
Note: Not all DMX personalities offer zone control.