


42
• Konica 3200 (color print)
• Fujichrome 1600D (color slide)
• 3M 1000 (color slide)
• Scotchchrome 400
• T-Max 3200 (black and white print)
• T-Max 400 (black and white print)
As you perfect your technique, try specialized films, that is films that are designed or specially treated for celestial photography. Here are
some popular choices:
• Ektar 125 (color print)
• Fujichrome 100D (color slide)
• Tech Pan, gas hypered (black and white print)
• T-Max 400 (black and white print)
There is no exposure determination table to help you get started. The best way to determine exposure length is look at previously
published photos to see what film/exposure combinations were used. Or take unguided sample photos of various parts of the sky while the
drive is running. Always take exposures of various lengths to determine the best exposure time.
T
T
e
e
r
r
r
r
e
e
s
s
t
t
r
r
i
i
a
a
l
l
P
P
h
h
o
o
t
t
o
o
g
g
r
r
a
a
p
p
h
h
y
y
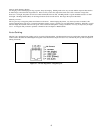
Your CPC makes an excellent telephoto lens for terrestrial (land) photography. Terrestrial photography is best done will the telescope in
Alt-Az configuration and the tracking drive turned off. To turn the tracking drive off, press the MENU (9) button on the hand control and
scroll down to the Tracking Mode sub menu. Use the Up and Down scroll keys (10) to select the Off option and press ENTER. This will
turn the tracking motors off, so that objects will remain in your camera's field of view.
M
M
e
e
t
t
e
e
r
r
i
i
n
n
g
g
The CPC has a fixed aperture and, as a result, fixed f/ratios. To properly expose your subjects photographically, you need to set your
shutter speed accordingly. Most 35mm SLR cameras offer through-the-lens metering which lets you know if your picture is under or
overexposed. Adjustments for proper exposures are made by changing the shutter speed. Consult your camera manual for specific
information on metering and changing shutter speeds.
R
R
e
e
d
d
u
u
c
c
i
i
n
n
g
g
V
V
i
i
b
b
r
r
a
a
t
t
i
i
o
o
n
n
Releasing the shutter manually can cause vibrations, producing blurred photos. To reduce vibration when tripping the shutter, use a cable
release. A cable release keeps your hands clear of the camera and lens, thus eliminating the possibility of introducing vibration.
Mechanical shutter releases can be used, though air-type releases are best.
Blurry pictures can also result from shutter speeds that are too slow. To prevent this, use films that produce shutter speeds greater than
1/250 of a second when hand-holding the lens. If the lens is mounted on a tripod, the exposure length is virtually unlimited.
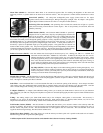
Another way to reduce vibration is with the Vibration Suppression Pads (#93503). These pads rest between the ground and tripod feet.
They reduce the vibration amplitude and vibration time.
The following is a brief description of the advantages of imaging at each f-number configuration and the proper equipment needed to use
the telescope in any of its many settings
F
F
/
/
6
6
.
.
3
3
w
w
i
i
t
t
h
h
R
R
e
e
d
d
u
u
c
c
e
e
r
r
/
/
C
C
o
o
r
r
r
r
e
e
c
c
t
t
o
o
r
r
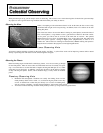
When imaging some objects like planetary nebula (for example M57, the Ring Nebula) and small galaxies (M104, the Sombrero Galaxy),
larger image scale is needed to resolve finer detail. These objects are better shot at f/6.3 or even f/10.
Medium size to small galaxies --
f/6.3 imaging gives you finer resolution then at f/2, but the slower f-number will usually require you to guide the image while you are
taking longer exposures. Guiding can be accomplished by using an optional Radial Guider or a piggyback guide scope. The exposure
times are about 10 times longer but the results can be worth the extra effort. There are some objects that are small enough and bright
enough that they work great at f/6.3. M104 (the Sombrero Galaxy) can be imaged under dark skies with a series of short exposures using
Track and Accumulate. Ten exposures at 15 seconds each will yield a nice image and is short enough that you may not need to guide the
exposure at all. For f/6.3 imaging the optional Reducer/Corrector is needed. (See Optional Accessory section at the end of this manual).