


18
EQ Two-Star Align
The EQ Two-Star Align follows most of the same steps as the Alt-Az Two-Star Align. This alignment method does not
require the user to align the altitude index markers or point towards the Meridian, but it does require the user to locate and
align the telescope on two bright stars. When selecting alignment stars it is best to choose stars that, a) have a large
separation in azimuth and b) both are either positive or negative in declination. Following these two guidelines will result in
a more accurate EQ Two-Star alignment.
EQ One-Star Align
EQ One-Star Align operates much the same way as EQ Two-Star Align however it only relies on the alignment of one star
to align the telescope. To use EQ One-Star Align follow steps 1 through 7 under the EQ Two-Star Align section.
EQ Solar System Align
This alignment method allows you use only one solar system object to
equatorially align the telescope for daytime use. To align your telescope
using a solar system object follow steps 1 through 7 under the EQ Two-Star
Align section.
C
C
P
P
C
C
R
R
e
e
-
-
A
A
l
l
i
i
g
g
n
n
m
m
e
e
n
n
t
t
The CPC has a re-alignment feature which allows you to replace
either of the original alignment stars with a new star or celestial
object. This can be useful in several situations:
• If you are observing over a period of a few hours, you may
notice that your original alignment stars have drifted towards
the west considerably. (Remember that the stars are moving
at a rate of 15º every hour). Aligning on a new star that is in
the eastern part of the sky will improve your pointing
accuracy, especially on objects in that part of the sky.
• If you have aligned your telescope using the One-Star or
Solar System alignment method, you can use re-align to
align to additional objects in the sky. This will improve the
pointing accuracy of your telescope without having to re-
enter addition information.
To replace an existing alignment star with a new alignment star:
1. Select the desired star (or object) from the database and slew to it.
2. Carefully center the object in the eyepiece.
3. Once centered, press the UNDO button until you are at the main menu.
4. With CPC Ready displayed, press the ALIGN key on the hand control.
5. The display will then ask you which alignment star you want to replace. Use the UP and Down scroll keys to
select the alignment star to be replaced. It is usually best to replace the star closest to the new object. This will
space out your alignment stars across the sky. If you have used one of the single object alignment methods then it
is always best to replace the object that is “unassigned” with an actual object.
6. Press ALIGN to make the change.
S
S
e
e
l
l
e
e
c
c
t
t
i
i
n
n
g
g
a
a
n
n
O
O
b
b
j
j
e
e
c
c
t
t
Now that the telescope is properly aligned, you can choose an object from any of the catalogs in the CPC's extensive
database. The hand control has a key (4) designated for each of the catalogs in its database. There are two ways to select
objects from the database: scrolling through the named object lists and entering object numbers.
Pressing the LIST key on the hand control will access all objects in the database that have common names or types. Each list
is broken down into the following categories: Named Stars, Named Object, Double Stars, Variable Stars, Asterisms and
Helpful
Hint
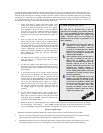
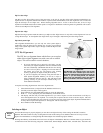
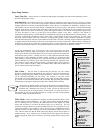
Figure 4-3
The Meridian is an imaginary line in the sky that
starts at the North celestial pole and ends at
the South celestial pole and passes through the
zenith. If you are facing South, the meridian
starts from your Southern horizon and passes
directly overhead to the North celestial pole.